
Google Merchant Center is the heart of every Google Shopping campaign. This article is an overview of what it is, how you can get started and leverage it to run the most high-converting shopping ads.
Table of Contents
What is Google Merchant Center?
Some people are under the assumption that GMC is a marketplace where you can sell your products. However, Google Merchant Center (GMC) is essentially an online platform where you can manage all of your product listings and use them for your Shopping Ads on Google, Youtube, and other Google partner sites.
What is Google Merchant Center – Socialhead.io
What is Google Merchant Center primarily used for?
Generally, Google Merchant Center is used to control online product information like pictures, pricing, availability, and how they are displayed on Google.
Once you have connected your account to GMC, you’ll be able to:
- Upload your products information. Google allows you to add multiple products and relevant information like titles, descriptions, conditions, or pricing and doesn’t charge you any fee for this.
- Reach more customers by running promotions. Advertising on Google lets you drive tremendous traffic to your website or even a local store. And the best part? You only have to pay when they click on your ads!
- Up-to-date performance report and insights: The platform provides you with detailed reports and points out what’s working and what’s not. Together with Google Analytics, you can further optimize your campaigns and accordingly maximize profits.
- Generate sales from all over the world. With its multi-country feeds function, you can reach potential customers from over 90 countries and start going global right from your laptop.
- Highlight promotions. Google knows that everyone loves discounts or any sort of promotional campaign. Thus, the platform enables you to set up site-wide promotions for your shopping ads or only promote a group of products.
- Set up dynamic remarketing: Remarketing allows you to show advertising to previous site visitors and personalize those ads based on the portion of your site they viewed. With this in mind, you can take it a step further by displaying dynamic retargeting ads with relevant product information customized to your customer’s recorded site activity.
Until now, you might be wondering:
Which Google services can you access through GMC?
As aforementioned, GMC is not a stand-alone application. Instead, you are able to connect it to other Google services as well as 3rd party eCommerce platforms or apps.
These integrations are the key to maximize your business performance if you know how to get it right.
Google My Business
GMB allows you to include all your business information like location, contact information, business hours, link to your website, and a business description.
By registering your company, you’ll immediately gain control over it. Google will show the information you provide, and your company profile will appear as a sidebar alongside search results or within Maps.
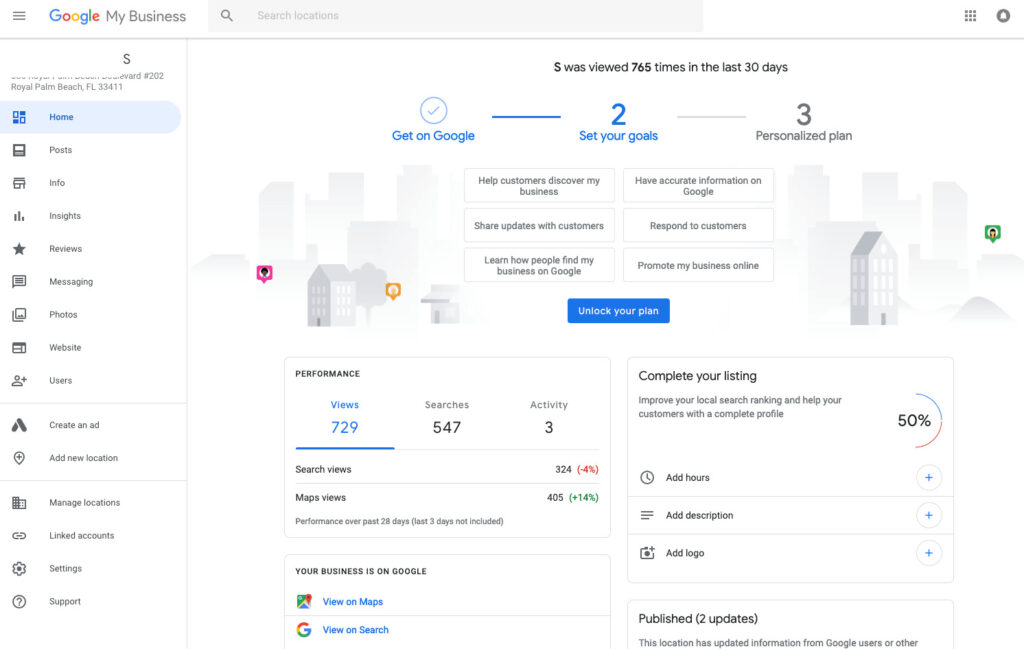
Google My Business dashboard
Google Ads
This is a paid advertising platform that you may use for various sorts of sponsored displays across Google’s brands. It was previously known as Google AdWords. You may leverage your product listings in your advertising campaigns by connecting Google Ads to your Google Merchant Center account.
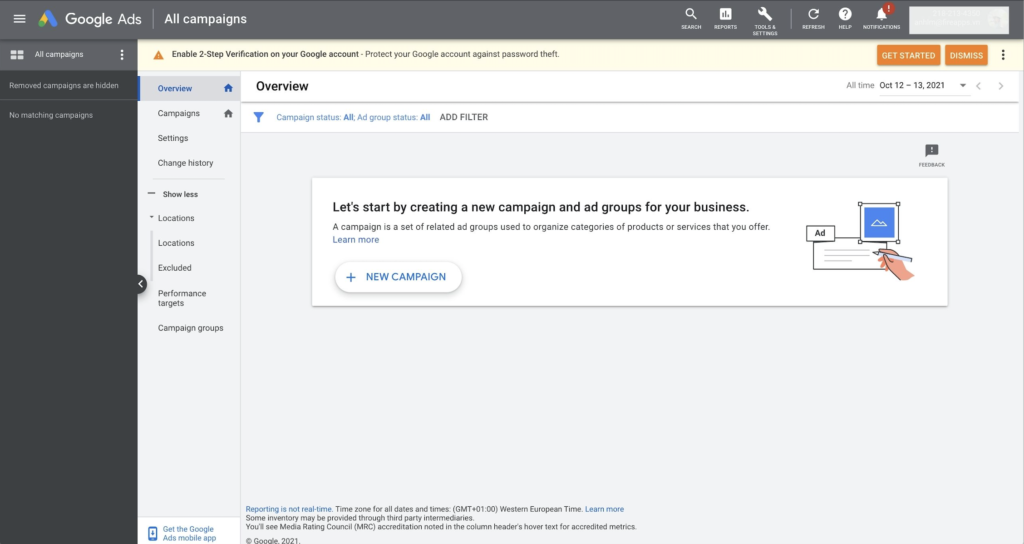
Google Ads dashboard
Google Analytics
This reporting tool gives you a closer look at your visitors’ activities. The Merchant Center does include performance reporting tools itself, but Google Analytics can provide additional reports on traffic, including organic and paid results and also visitors’ behavior.
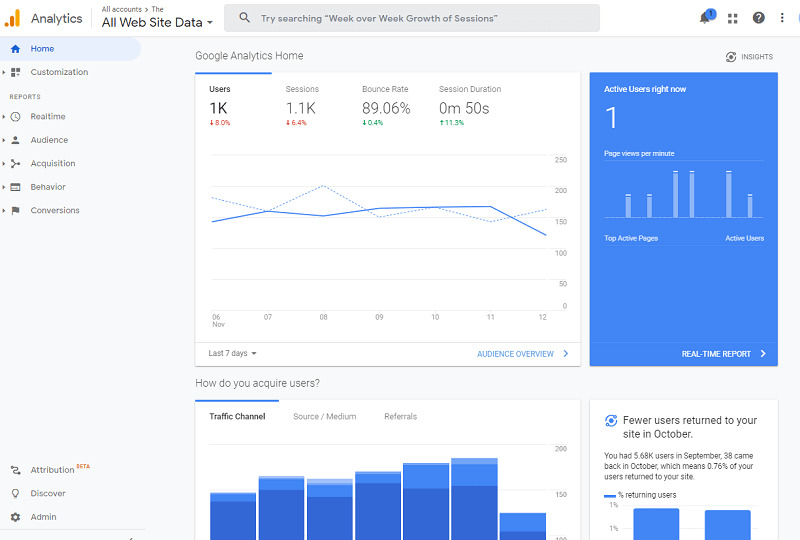
Google Analytics dashboard
Keep in mind that there are also other integration options apart from Google-to-Google. You can take a step further to sync with eCommerce platforms like Shopify or connect to a variety of third-party applications.
For instance, connecting your Google Merchant Center account to Socialshop will help you manage both your Google and Shopify stores in one place.
Does Google Merchant Center cost anything?
The Google Merchant Center account is 100% free to register, set up, and use.
However, remember the main reason why we love this platform: it assists us with our Google Shopping Ads!
In other words, you must pay if you run Google Ads.
Essentially you have 2 payment options:
- CPC – Cost per click: You’ll pay a certain amount of money each time a potential customer clicks on one of your advertisements using this approach.
- CPE – Cost per engagement (CPE): You will have to pay for each time a visitor performs certain engagement actions with your ads. These engagements can be watching an ad for more than 10 seconds, scrolling the ads or tapping on them.
How to set up Google Merchant Center?
Before we begin, you’ll need a Google account like Gmail to register for GMC. If you don’t have one available, simply create a new account, and then we shall continue.
Create a new Google Merchant Center account.
- Go to GMC homepage > Get Started.
- From there it will direct you to a page where you can fill in your store’s website if you sell online.
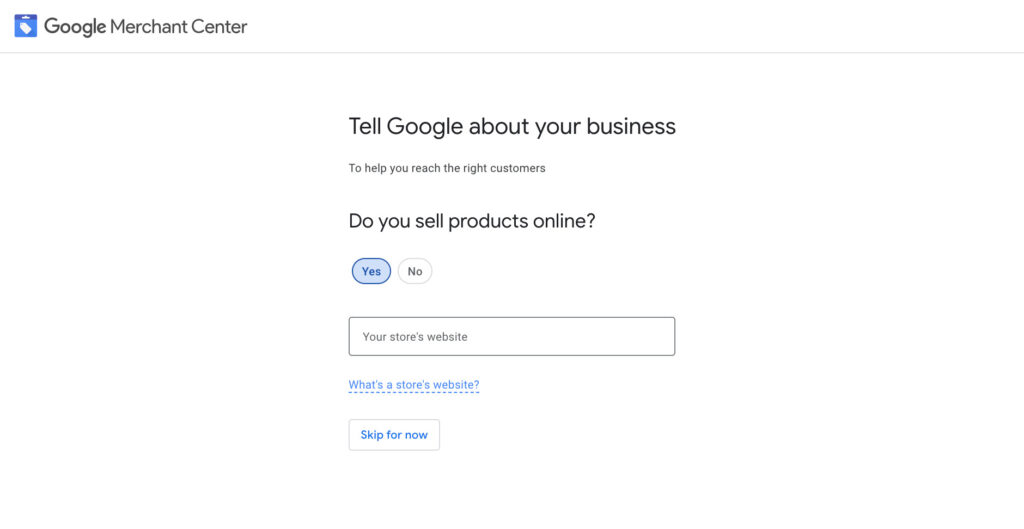
Tell Google about your business
- Once you’ve filled in, you’ll see a page where you can type in basic information about your business like your business name, country or time zone.
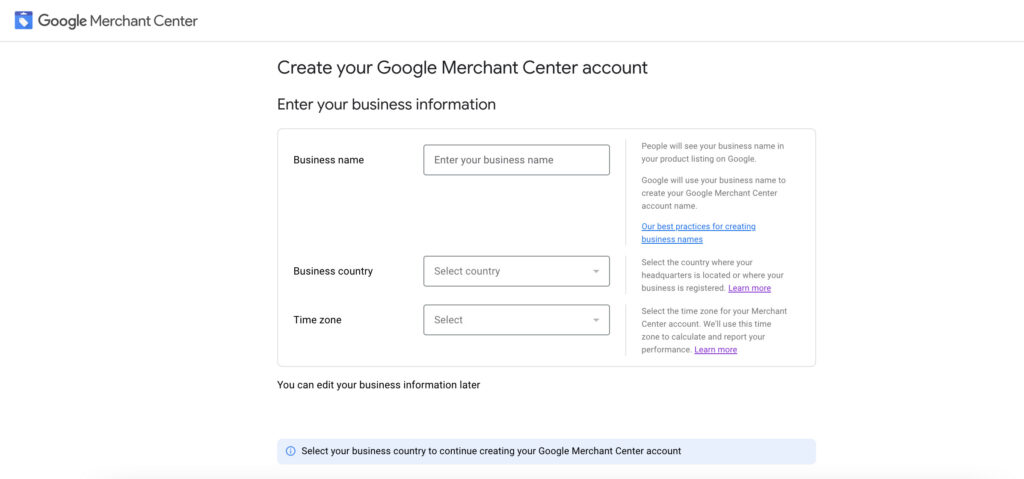
Enter your business information
- Check the box “I’ve read and agree to Google Merchant Center Terms of Service” and then click “Create account”.
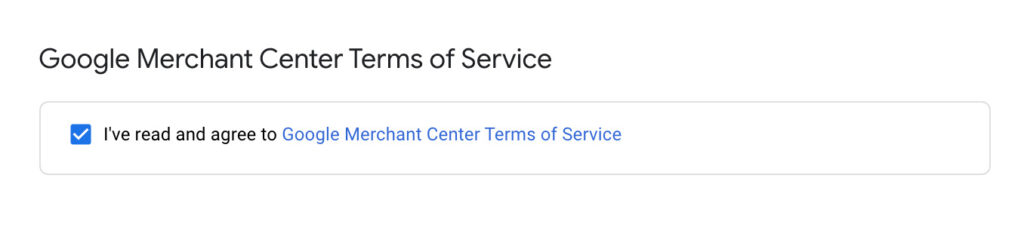
Agree to GMC Terms of Service
And that’s all! It only takes a few simple steps to create an account for GMC. Now we are ready to set up your account.
Set up your Google Merchant Center account
- First of all, you have to to add your business details like address line, city, state or ZIP code. Just fill them in.
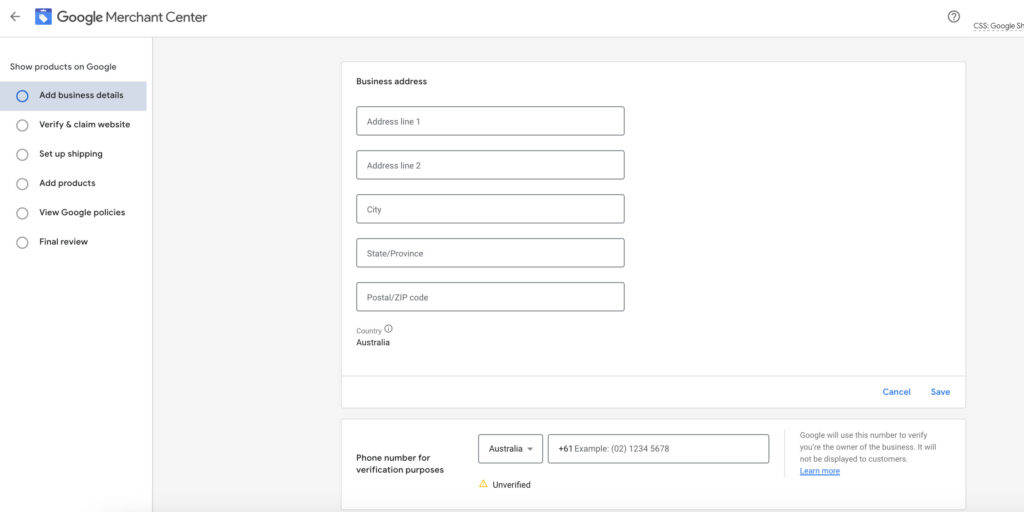
Enter business address and phone number
- Next step, you’ll need to enter your store URL and verify your website. If you succeed, your screen will look like this.
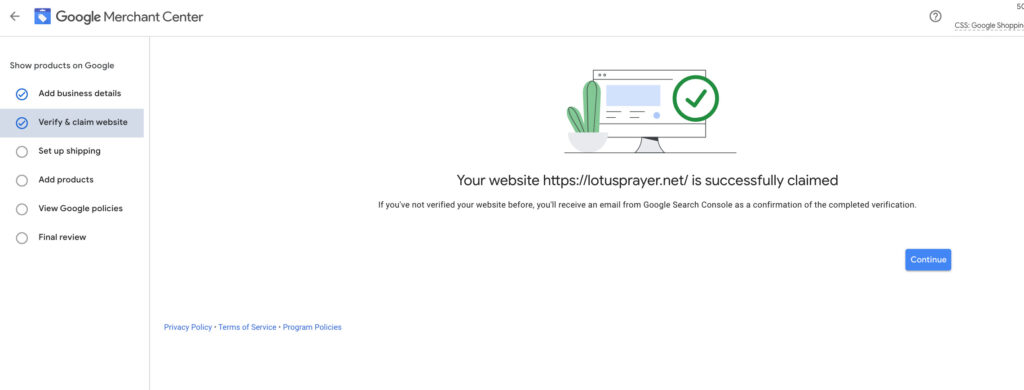
Verify and claim website URL
- After that, you’ll see the shipping setting section.
- To begin with, fill in your shipping service name, country, currency, and delivery location as requested. Bear in mind that the country and the currency should match with those listed in your feed. You can choose more than one country.
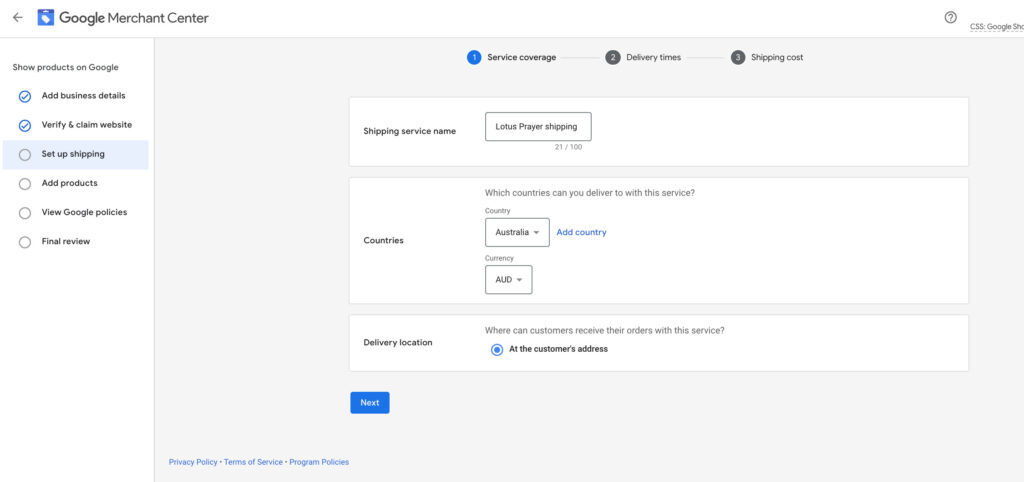
Service coverage setting in GMC
- Secondly, enter the order cutoff time, handling time, and transit time to set up delivery time in Google Merchant Center.
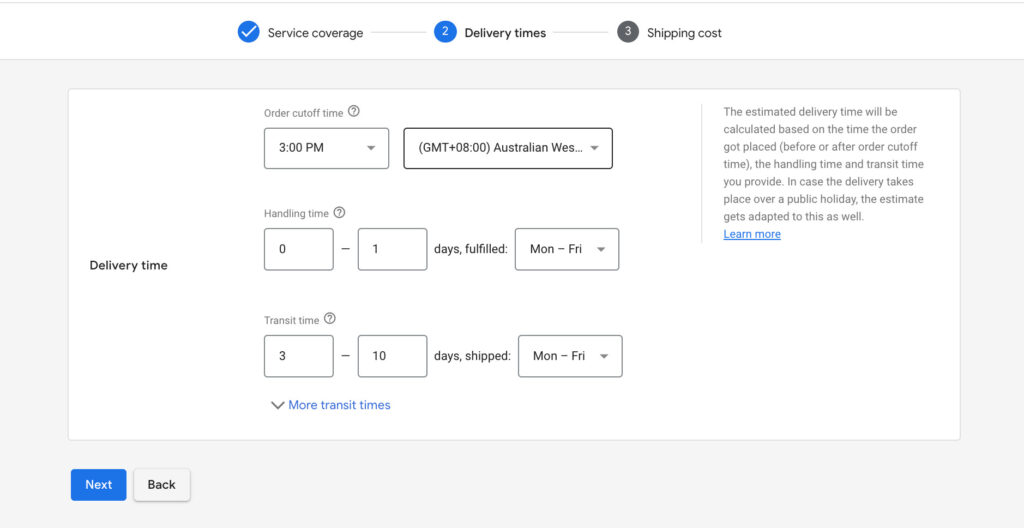
Service coverage setting in GMC
- Order cutoff time is the time after which you will no longer process orders received on that day. For instance, if the order cutoff time is 3:00 PM (GMT+8), orders submitted after that will not be processed until the next business day.
- The handling time is the period between the order cutoff time after an order is placed and when the shipment for the order is ready for transportation (hand off to carrier). If the shipping is ready on the same day as the order, enter 0 – 0. (if the order was placed before the cutoff time for the day).
-
- Transit time is the time it takes the carrier to deliver a product to a customer.
-
- Don’t forget to use the drop-down menu to pick a day range for processing orders on which days of the week you want to process orders. In this example I picked Mon-Fri but you can pick any other date range that you prefer.
- Last but not least, choose the shipping cost of your choice. For instance, I choose Free shipping and click Save.
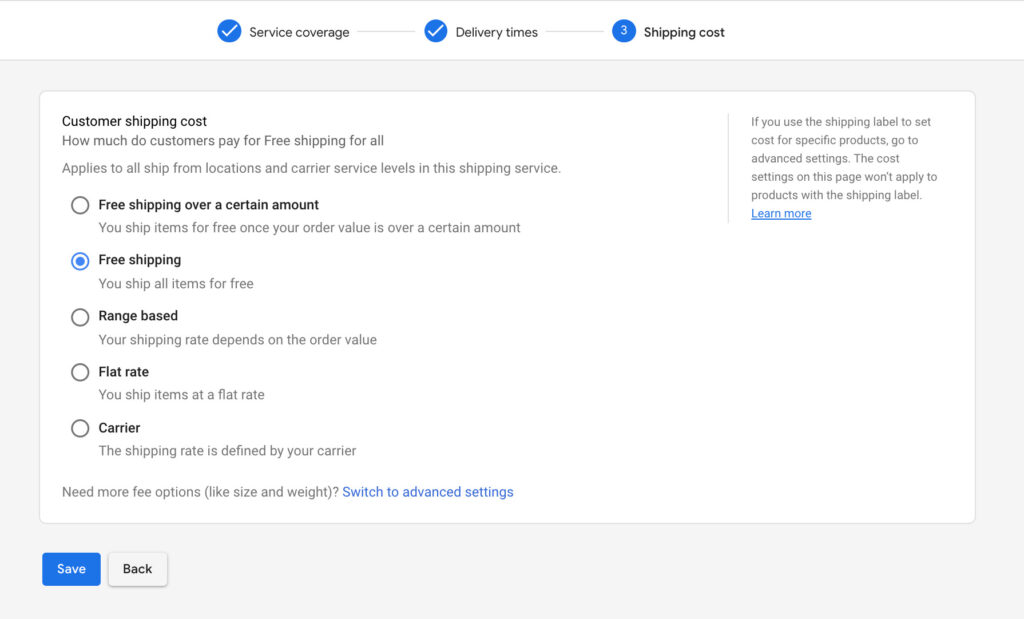
Shipping cost setting in GMC
Easy, right? Now, what’s next?
It’s time to create a feed and add your products.
How to add products to Google Merchant Center?
From the last step that we take, click next and you’ll see the “Add products” section. You can either choose to add one or multiple items at a time.
Adding a single item at a time might require a lot of time and effort. You’ll have to fill in necessary information such as country of sale and destinations, product identifiers, product data, price & availability, or shipping and returns.
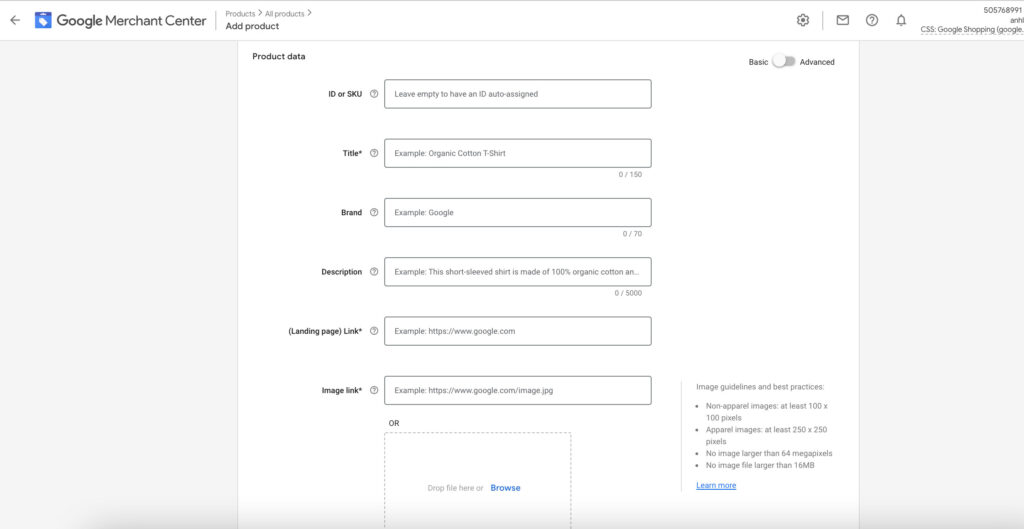
Add products information in Google Merchant Center
On the one hand, if you prefer manual work, just go ahead and opt for this option. However, I don’t think this one is an optimal choice as you’ll have to spend hours and hours adding products one by one.
On the other hand, when you choose the option of adding multiple products, you will be able to create your primary product feed.
For your information, a feed is simply a source that Merchant Center uses to access and display your product data. Once your feed is created, you’ll be able to update it or modify your data without having to submit it again.
Now follow the prompts and enter your country of sales, language, and destinations.
At this point, choose your Primary feed name and the input method of your choice among these 4:
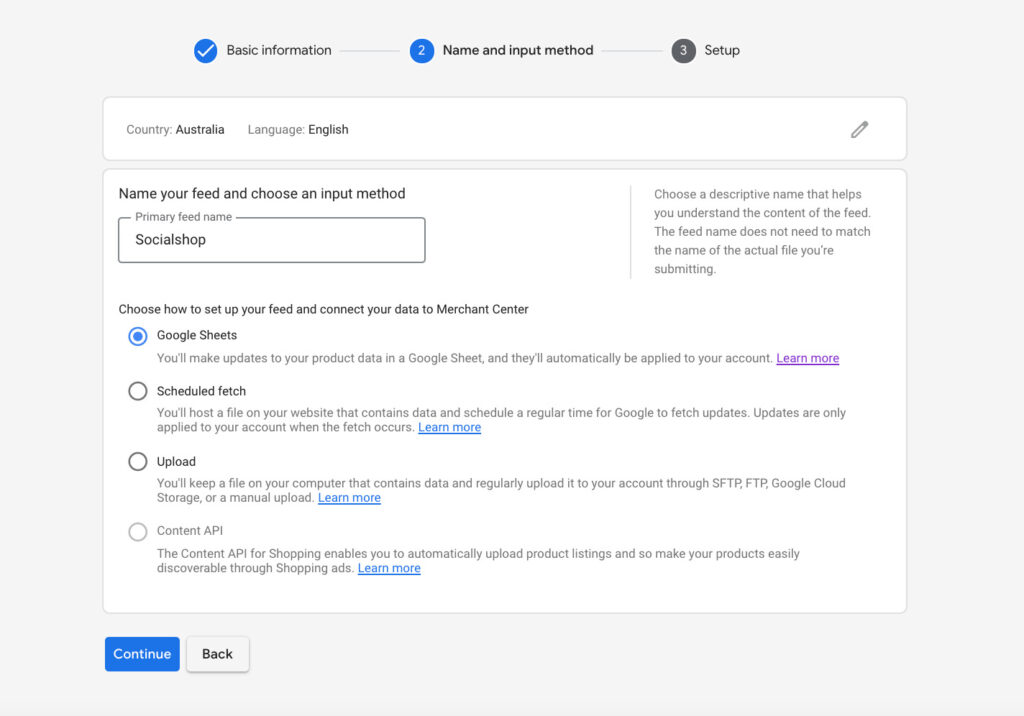
Add feed in Google Merchant Center
- Google Sheets: you can upload an existing sheet with your product data or use Google’s generated sheet templates and fill in the necessary information.
- Scheduled fetch: Google actually fetches your feed directly from your server.
- Upload: You can upload your files manually or using SFTP, FTP, Google Cloud Storage.
- Content API or Website crawl: If you don’t have any feeds in your account but you have the appropriate structured data on your website, Google can crawl it to obtain your product data.
You find those methods too complicated to handle? Here is our good news! As aforementioned, you can indeed integrate your GMC account with 3rd party apps to further optimize the feed management process.
And if you’re interested, you should definitely check out one of our most trending apps: Socialshop. The only condition to use Socialshop is that you’re also selling on Shopify, BigCommerce, or WooCommerce.
Unlike manual work, the tool will help you set up, create feed, and sync products data right from your existing eCommerce platform. In addition, Socialshop has some of the best functions to assist you to optimize your product feed for more discoverability and visibility on Google Shopping.
More importantly, it’s super user-friendly and takes only a few simple steps to finish. Instructions below:
- At first, you need to register an account on our website and set up your product source, this can be your Shopify, BigCommerce, or WooCommerce store.
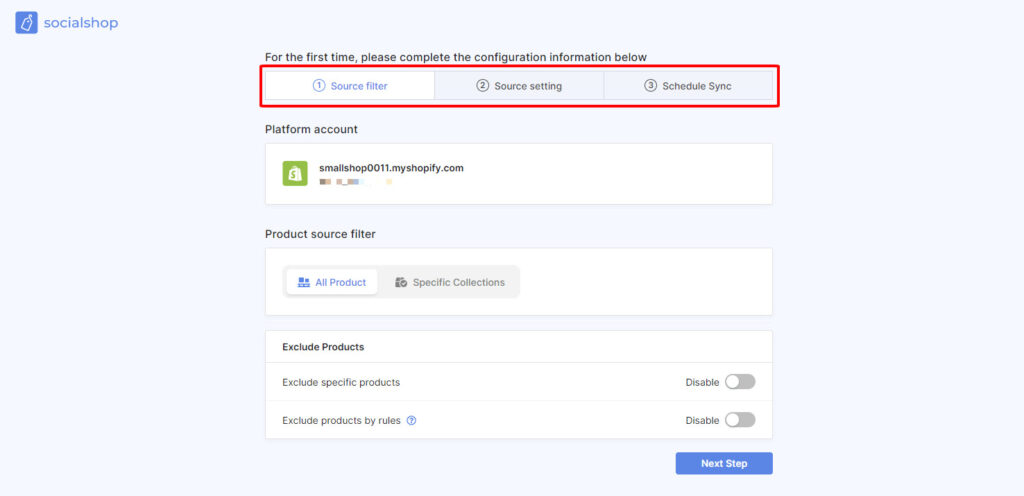
Set up product source in Socialshop
- Then you’ll be taken inside the app, from here click “Add feed”.
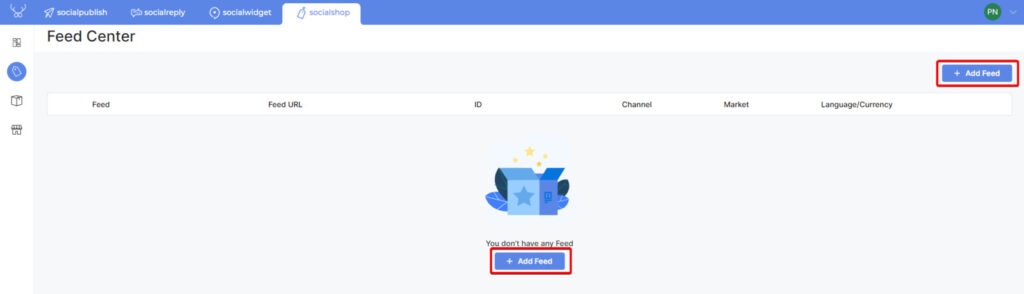
Add feed in Socialshop
- Next, choose Google Merchant as the channel you want to create your feed.

Choose a channel to create a product feed in Socialshop
- At this point, you’ll be asked to log in to your GMC account. Then, a window appears to let you set up the feed. Enter your Target Market, Language, and input a Feed Name of your choice. Hit Next.
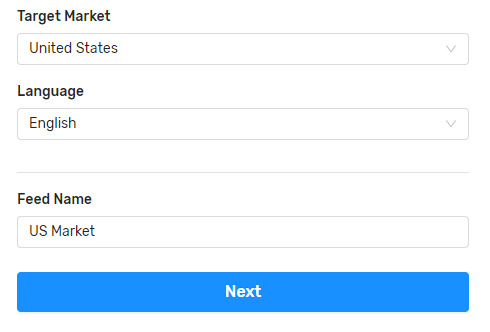
Fill in target market, language and feed name in Socialshop
- After connecting your Google Merchant Center account, our app will sync products from your store based on your settings and create a feed in-app.
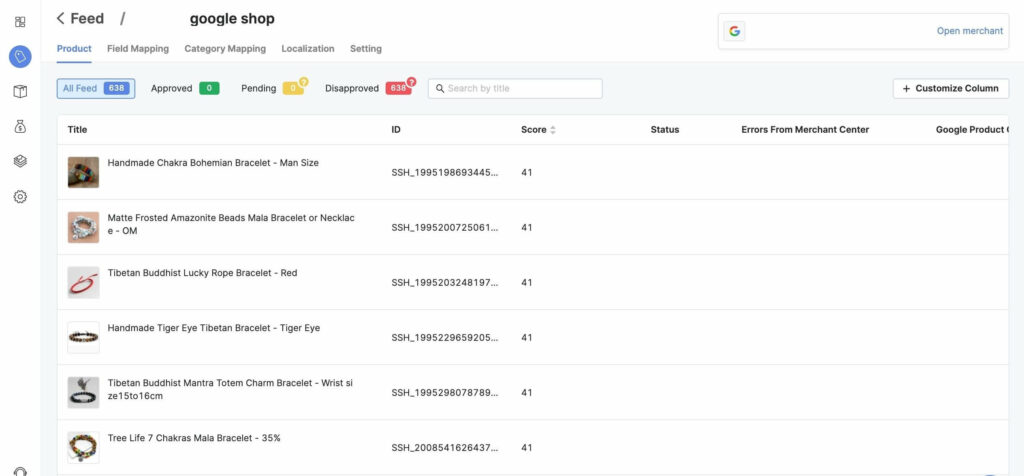
Google Merchant Center feed in Socialshop
From here you can see the status of your products. When first synced, they will appear as Pending as they are being reviewed by Google. The reviewing process might take up to 3 business days. If they meet Google’s requirements, you’ll see your items in the Approve columns.
After 30 minutes, your feed will appear in Google Merchant Center with your preset Feed name.
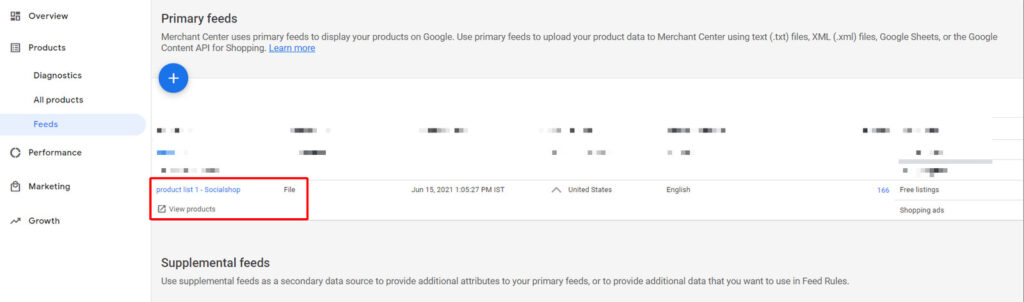
Product feed in Google Merchant Center
And you’re done! It is super easy and takes less than 30 minutes for the whole process.
How to link Google Merchant Center to Google Ads?
Above all, we all want to generate sales on Google Shopping. Thus, you definitely don’t want to miss out on this function.
- Start with your Google Merchant Center backend: Settings > Linked Account > Google Ads > Link account.
- Then enter your Google Ads customer ID and click Send link request. <ảnh số 21>
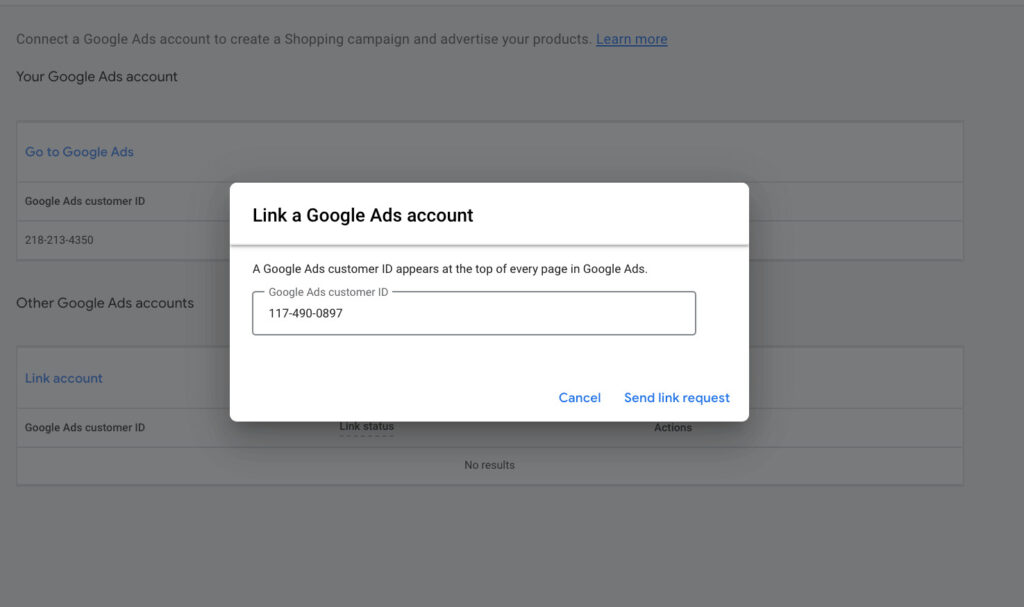
Send link request to Google Ads
- A link request will be sent to your Google Ads account. Now go back to Google Ads, navigate the notification button, click View > Accept link request.
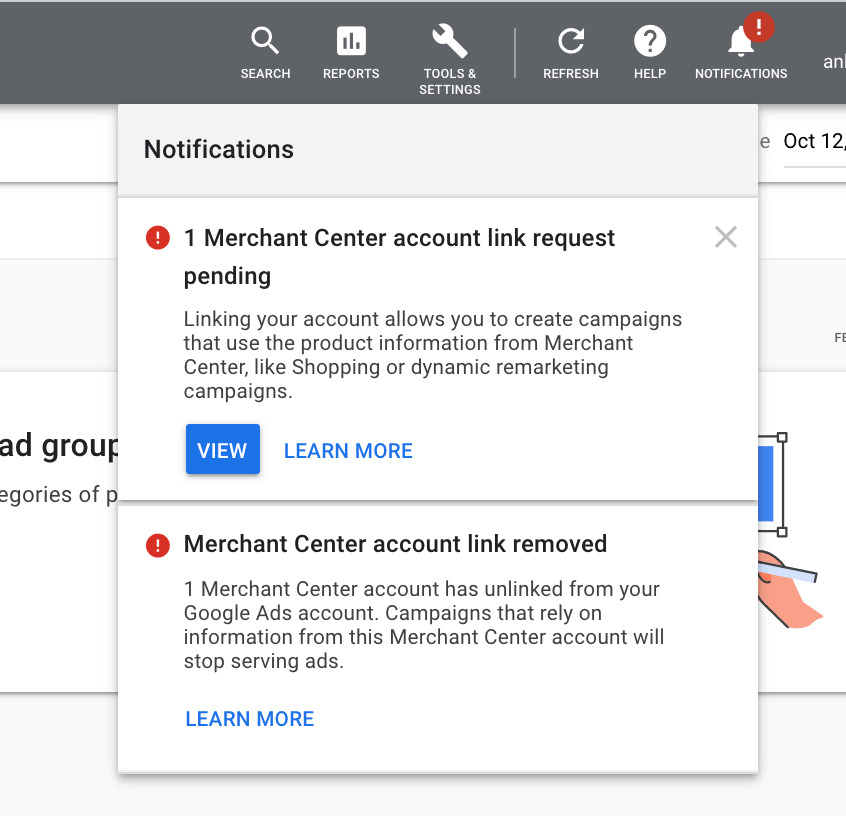
Accept link requests in Google Ads
Congratulations, your Google Ads and Google Merchant account are successfully linked! You can obviously reverse this setting by clicking on the unlink button from your GMC backend.
Conclusion
To summarize, if you are an entrepreneur, Google Merchant Center can be an integral part of your digital marketing campaign. Mastering the Google Merchant Center data feed and Google Ads can give you a huge advantage over your competitor.
Besides, don’t forget you can always count on Socialshop if you are you are available on Shopify, WooCommerce, or BigCommerce and Google Shopping is your next destination.


 socialshop
 socialpublish
 socialreply
 socialwidget