
With the dramatic increase of users from only 2,000 to over 10,000 at the beginning of 2021, Socialwidget once again is listed in the Shopify Staff Pick as the one of must-have apps for Shopify businesses.
We could not make it happen without the trust and support from our valued merchants, and we want to celebrate this achievement with you!
Table of Contents
Socialwidget Version 2.0 Is Available Now!
To keep on developing Socialwidget to an advanced level and offer our merchants more crucial solutions to meet or even exceed your expectations, we present you to Socialwidget Version 2.0.

Socialwidget version 2 is available!
This March 23rd, 2021, we officially launched a big updated version of our ‘Socialwidget V2.0’.
The new version of Socialwidget is available now on Shopify App Store and Socialhead platform.
This version is expected to turn our app into an all-in-one tool with multiple new features to help you leverage Instagram feeds for your Shopify businesses.
Get ready because there will also be some changes in app structure and user experience that you may get to know in time.
Check out what’s new in Socialwidget V2.0.
Get Started With A Brand New ‘Socialwidget’
In this version, Socialwidget is restructured to enable users to connect Instagram accounts and get started in a new flow.
- Create a Media Source first > Create a Gallery from your Media Source > Tag your products into media items > Create Widgets from gallery > Install your widgets on Shopify storefront
Media Source
A media source will connect with an Instagram account (Personal/ Business account) to let merchants import all media from. Media will include images, videos, and carousels. A media source can be linked to one Instagram account only.
Besides, it’s good news for merchants because there will be features supporting IGTV, Stories, and other social platforms in the upcoming time, so please stay tuned.
If merchants would like to import media from different Instagram accounts, you can create multiple media sources. Each user can create up to 5 media sources.
Users can import media from a media source in 2 ways: Profile or Hashtag. Please note that the Hashtag method is only applicable for Instagram business accounts.
Create Media Sources
To add a new media source, go through these simple instructions:
Socialwidget > Media Sources > Add new source > Connect your Instagram account(Personal/ Business Account) > Follow instructions > Name your media source > Done
Instagram Personal Account
Go to Socialwidget > Media Sources > Add new source > Connect your Instagram personal account > Follow instructions > Name your media source > Done
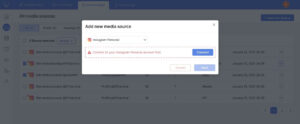
Add a new media source
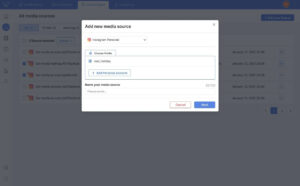
Connect your Instagram personal account
Instagram Business Account
Go to Socialwidget > Media Sources > Add new source > Connect your Instagram Business account > Choose to import media by Profile or Hashtag
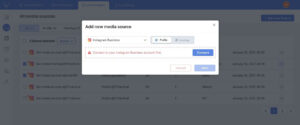
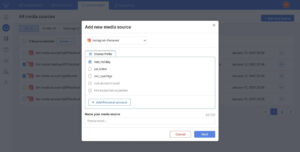
Import media from a media source either by Profile or Hashtag
By Profile
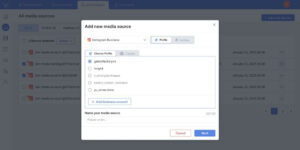
Pick the profile you want your media source to connect to
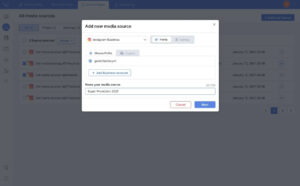
Keep track of the profile by giving it a custom name (This is only applicable for Instagram Business)
You can import media from your Instagram business profile, or you can get the media from another Instagram business profile by entering a profile name.
One of the most simple ways to tell if an Instagram profile is Personal or Business is the Contact Button. If it is an Instagram business account, then there will be a Contact button appearing on the mobile interface. If you are still not sure that your Instagram profile is Personal or Business, read this article.
By Hashtag
Users can source media by hashtag. You can only add one hashtag at a time. This will help merchants to import all the media related to the hashtag. Please note that you don’t need to add #, just input your hashtag.
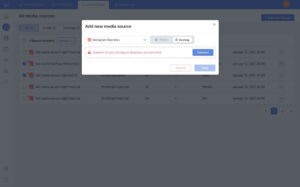
Connect your Instagram business account first to import media by hashtags
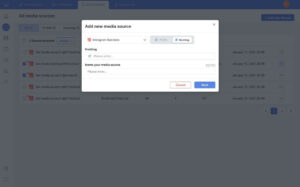
Enter your hashtag to import the related media
Edit Media Sources
All your media sources will be centralized in one place so that you can manage and edit them easily.
Socialwidget V2.0 enables you to auto-sync media sources every 6 hours, daily or weekly, and get notified via emails. On the other hand, you can also manually sync your media source.
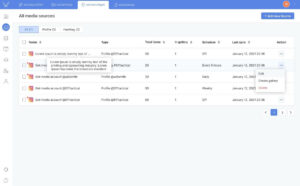
Socialwidget V2 can manage all media sources in one place
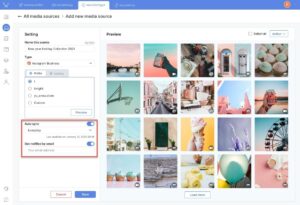
Enable or disable auto-sync and email notification as you want
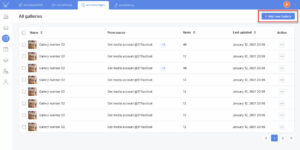
Gallery
A Gallery will contain all the images, videos, and carousels from a media source, and it can connect to maximum 5 media sources at a time. Socialwidget will ask you to create a media source and connect your Instagram account if you haven’t got at least one media source.
Create A Gallery
Go to Gallery > Add new gallery > Name your gallery > Choose one or multiple media sources > Save > Done
Add new gallery
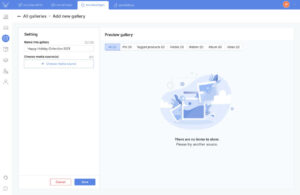
Name your gallery
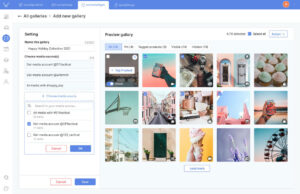
Choose media sources
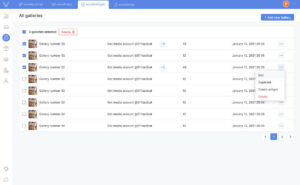
To edit, duplicate or delete a gallery, just go to the gallery center and click on 3 Dot Icon.
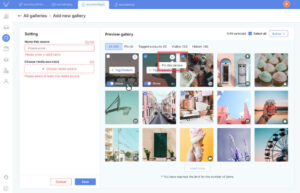
In Socialwidget V2.0, merchants are given a feature that allows them to pin items. This will help you prioritize top items to show in your gallery.
Tag Products to Media
If Socialwidget enables users to tag products to only images to make Instagram feeds shoppable, Socialwidget V2.0 allows you to do more than just that.
With this new version, merchants can tag up to 5 items (products & variants) to not only single images but also carousels and videos. You can also change the order of tagged products just by dragging and dropping.
To tag products to media, go to Gallery > Choose a gallery > Click on an item (image/video/carousel) > Add products/variants > Save > Done
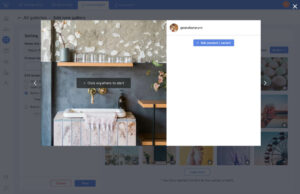
Add products or variants to an image/video/carousel
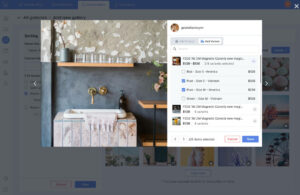
You can add up to 5 items (Products/variants)

Capture more attention by adding promotions
Moreover, you are able to add HOT BADGE to make your product eye-catching and stand out.
Widgets
A widget will include all the media from a gallery. Once users create a gallery or multiple ones from a gallery, they can install their widgets on the Shopify storefront as social proof and decorations.
Socialwidget is built to make your widgets responsive on both desktop and mobile. Moreover, we also offer users all the features and tools to customize widgets in their own styles.
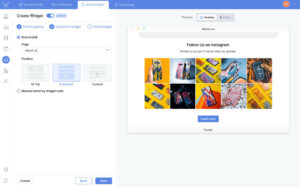
Create A New Widget
Go to Widget > Add new widget > Choose gallery > Customize widget > Install widget > Save > Done
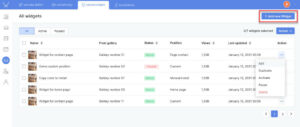
Add a new widget
Choose Gallery
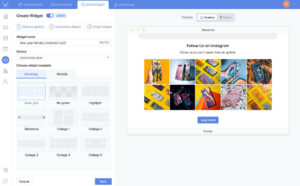
Choose which galleries and which templates you want to apply for your widget
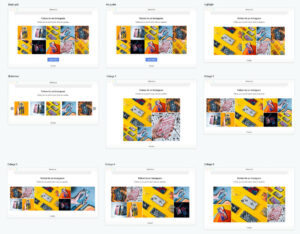
There are 9 templates for you to pick
Your widgets will be displayed differently and nicely up to the template you choose. There are 9 available templates (for desktop) and 6 templates (for mobile) for users to choose from.
You will go through various widget settings to decide how your widget is
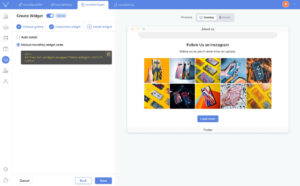
Customize Widget
In Customize Widget stage, you will be able to decide how your widget will be created through 4 settings:
Configure Widget Layout
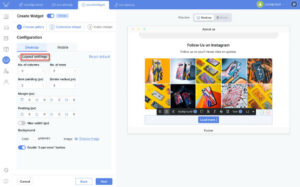
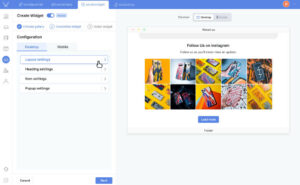
Layout Settings
In this section, you can decide how many columns, rows your widget will have, margin, padding.
Moreover, two of the most significant features in Layout Settings that our users have been asking for are Max-width and Background.
- Max-width: This makes your widget responsive to your Shopify storefront as much as possible to ensure it fits with the store page.
- Background: Users can set up backgrounds for their widgets by uploading new images or selecting available images.
Configure Widget Items
This is where you can configure your effect and customize the content of your widget.

Item Settings
Configure Widget Heading
In this section, users can craft content for titles and descriptions. You can also disable or enable the title and description as you want. Above all, users can add URL to title and description to drive traffic and conversion.
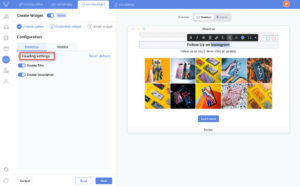
Heading Settings
Configure Widget Popup
Popup settings are tools for you to determine how and where your customers will be taken to when they click on the product/variant tags. You can also make some adjustments to your widget such as enable or disable like count, captions, follow button, date, or how you display product items.
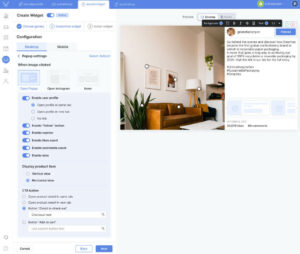
Popup Settings
Don’t worry if you think you might mess up with the setting because you can reset your settings back to default anytime by clicking on the Reset Default.
Install Widget
This is the final step to showcase your widget on your Shopify storefront. You can choose to Auto-install your widget or manually install by widget code.
Auto Install
Users can decide where the widget will be installed (Homepage, About Us, etc) or which on-site positions the widget will be displayed.
Manually Install By Widget Code
Each widget will include a code. Users can embed the widget anywhere they want just by copy and paste the code.
All you need to do is copy the widget code, and paste it into your Shopify website template.
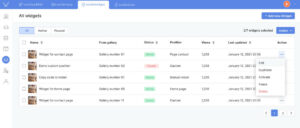
Edit, Delete, or Duplicate A Widget
Go to all widgets and click on the 3 Dot Icon to edit, delete or duplicate a widget. You can activate or pause a widget there as well.
Manage Multiple Instagram Accounts In One Place
Add Multi Instagram Accounts
The new Socialwidget V2.0 will empower users to add and manage multiple Instagram accounts including personal and business accounts in one place.
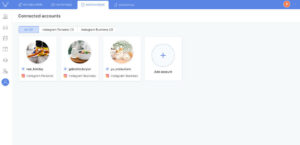
Add and manage multiple Instagram accounts in one place
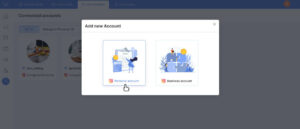
Pick personal account or business account
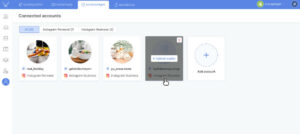
You can set avatars for your Instagram accounts

In addition, you can adjust the avatar
Remove Instagram accounts from Socialwidget
Socialwidget V2.0 enables you to remove Instagram accounts from the app as you want, however, there are some notes you need to know first.
To remove an Instagram account from Socialwidget successfully, you must delete all the related data including media source, gallery, and widgets connected to that Instagram account. This less convenient process is very necessary to guarantee data safety and synchronization.
In details, the flow to delete an Instagram from Socialwidget will be like this:
Delete Widgets > Delete Gallery > Delete Media Source > Remove Instagram account
This “little” rule is applied the same for media source and gallery. Only widgets can be deleted easily without removing any other related data.
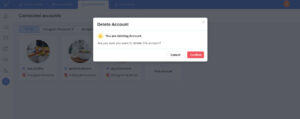
Delete Instagram accounts easily
Be the first one to experience Socialwidget V2.0 for free available on Shopify App Store and Socialhead platform.
If you have any questions or problems when using Socialwidget as well as our other apps, feel free to contact our Customer Support team via live chat or our email support@socialhead.io.
You can subscribe to Socialhead’s social media channels on Facebook, Instagram, Twitter, Linkedin & Youtube for the latest updates and useful tips and tricks via Socialhead’s blogs.


 socialshop
 socialpublish
 socialreply
 socialwidget