

With a successful online business comes genuine hardship. Firstly, you need to decide on what to sell, pick your brand name, design a unique logo and a theme for your website.
Afterward, you have to make every effort to answer endless questions. How to gain traffic? How to convert and retain customers? How to increase brand awareness? The list goes on and on!
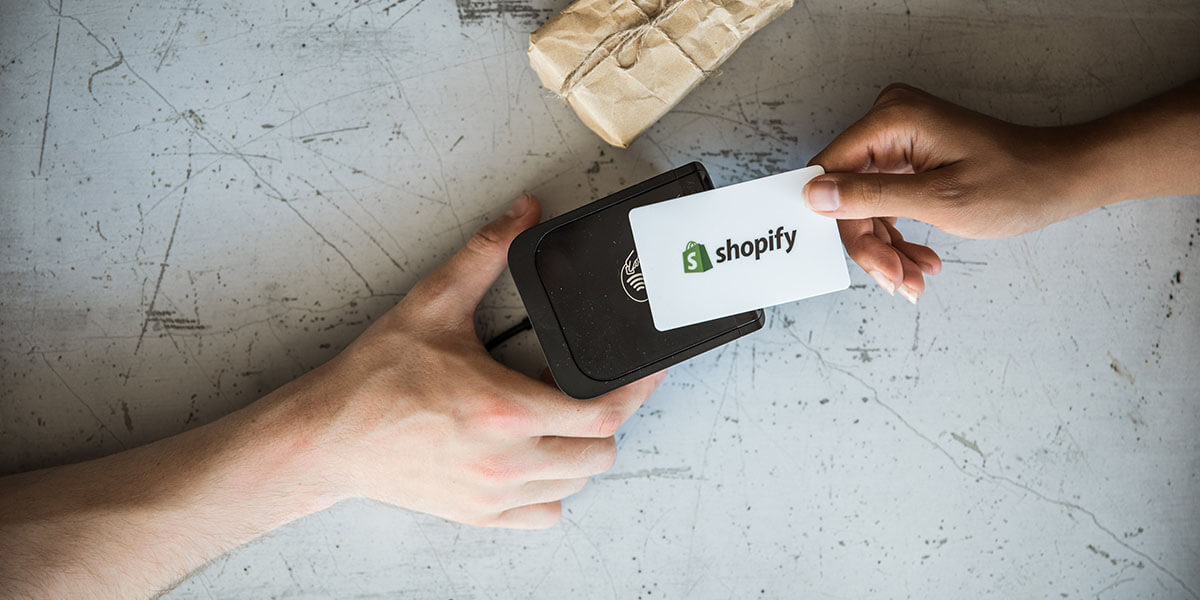
Apparently, launching a business from scratch is tough even with Shopify. That’s why many now gravitate towards buying an already existing business.
In this article, we’ll give you everything you need to know about Exchange Marketplace– How to Buy and Sell a Shopify Store.
Table of Contents
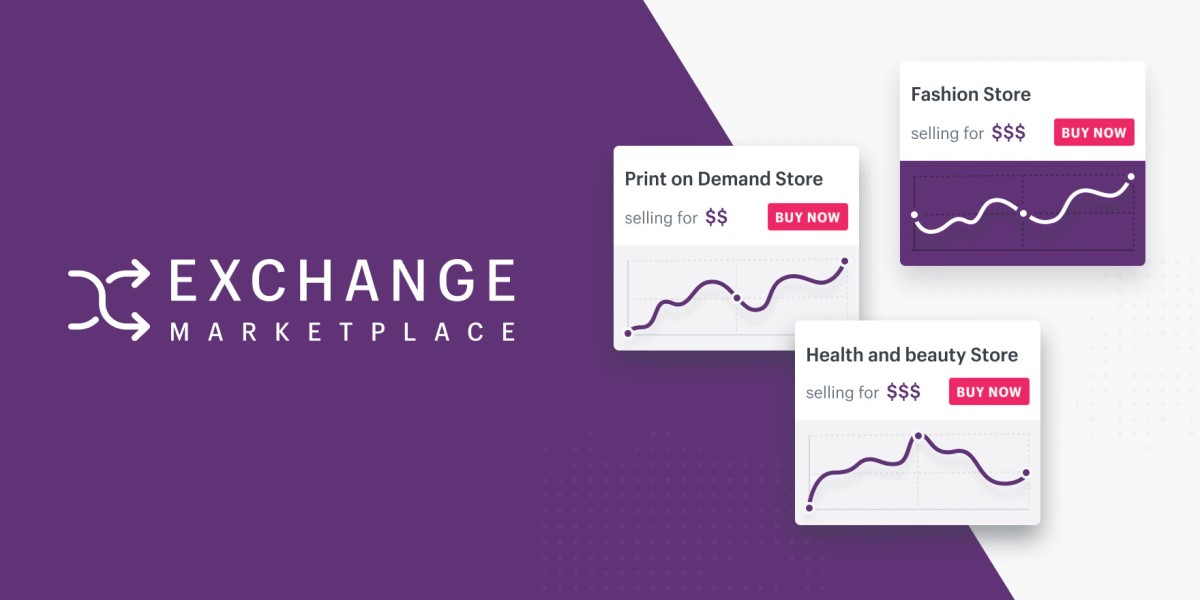
What is Shopify Exchange Marketplace?
Exchange Marketplace is an open space for selling and buying eCommerce businesses established by Shopify store owners. These sellers can list their stores for sale using the Exchange app which pulls data directly from Shopify.
Typical store listings on Exchange include information about:
- Business Story: the history of the store, its vision & mission, the reason for selling the business and the benefits of buying it, etc.
- Performance: all the important metrics regarding sales, revenues, traffic of the store
- Expenses: how much does it take to keep the business at bay?
- Sale includes: does the seller sells the store in a whole package. These assets include social media accounts, store logo, mailing lists, domain, physical warehouse, etc.
- Seller’s Advice: tips and advice from the seller on how to run the business effectively
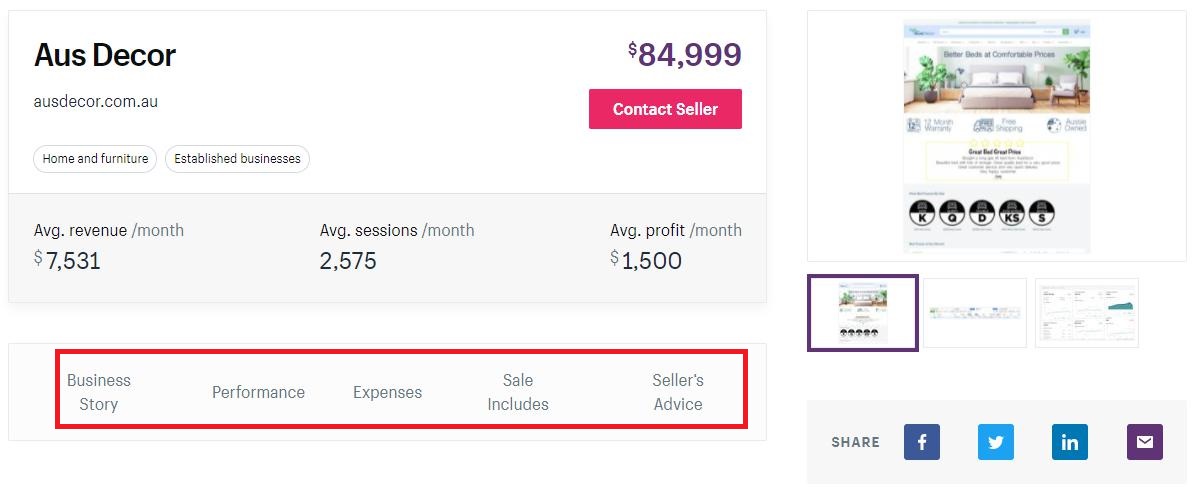
A typical store listing will contain these 5 main sections
And because store owners cannot make any alterations or amendments to their store’s data, buyers can rest assured what they see is exactly what they get.
Overview about Shopify Exchange Marketplace
Firstly, we want to make sure that you get the basic concept of Exchange. Thus, we’re going to cover real quick Exchange’s buying process and requirements.
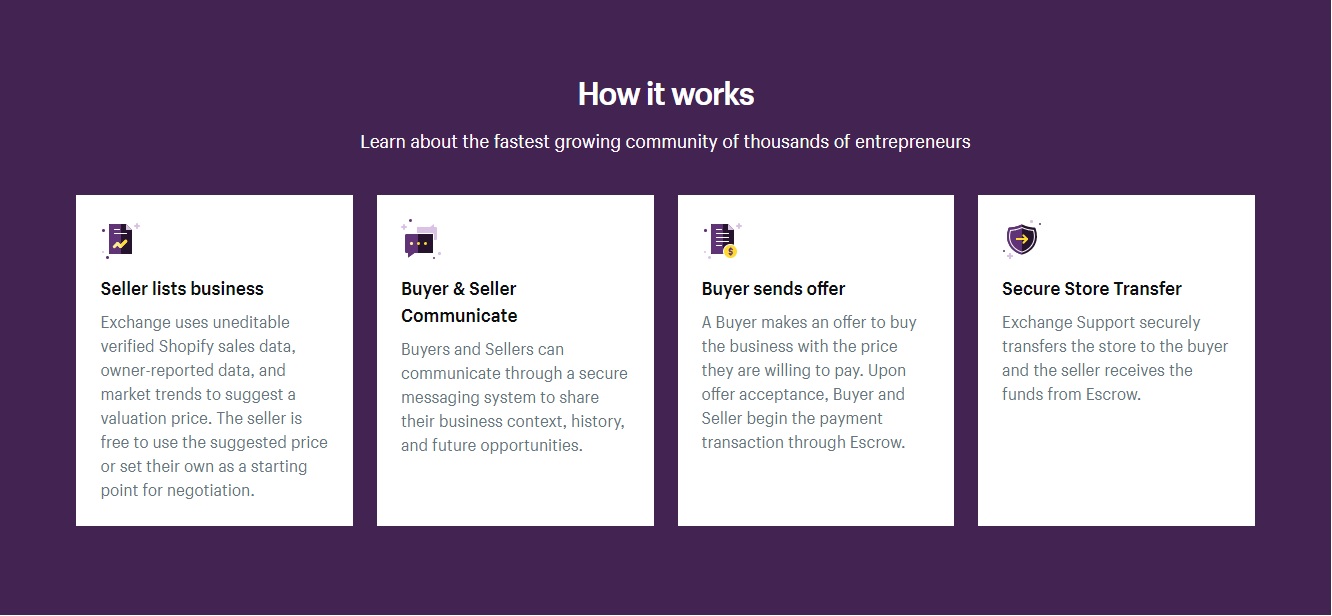
Image Source: Shopify
The overview of the buying process
The buying process generally follows these steps:
- Find a store that appeals to you
- Contact the seller
- Send an offer once the seller responds
- The seller accepts the offer
- The seller initiates an Escrow transaction
- You are proceeded to agree on the terms and process payment
- Escrow approves the payment
- Seller transfers all assets to you
- At this stage, all assets are marked “received” in Escrow
- Buyer scan and peruse all the assets
- After the inspection stage ends, all assets are switched from “received” to “accepted”
- In 3 business days, you will be switched from staff to the store owner by the Shopify account team
- The transaction finishes with no possibility of any refund
Requirements users need to adhere to
Shopify wants to build a safe and secure environment for both buyers and sellers on Exchange Marketplace. Thus, here are the guidelines and requirements to comply with:
- You must be at least 18 years old
- Escrow is not available in many countries yet. Therefore, you can’t use Exchange if you’re living in one of the listed countries: Afghanistan, Belarus, Algeria, Cambodia, Angola, Central African Republic, The Democratic Republic of Congo, Cuba, Chad, Azerbaijan, Burundi, Egypt, Côte d’Ivoire, Haiti, Eritrea, Iraq, Ethiopia, Lebanon, Democratic People’s Republic of Korea, Somalia, Sudan, Guinea, South Sudan, Panama, Pakistan, Myanmar, Uganda, Yemen, Zimbabwe, Tajikistan, Sierra Leone, Russian Federation, Lao, Suriname, Syrian Arab Republic, Ukraine, Venezuela, Uzbekistan, Libya, and Moldova
- Never use Shopify Exchange for promotional purposes
- You can’t put your store up for public auction
- Buyers and sellers must communicate via Exchange only. That means you’re not allowed to leave personal contact info (email address, phone number, etc.)
- Always insist Exchange on any changes regarding store ownership
- Don’t use Exchange to scout for business partners
- Your business listings should be original. Do not copy from other stores on Exchange
- Your templates need to be unique, not a replica of any other store
- Both parties should only process payment via Escrow. Otherwise, Shopify cannot assist you in case any issue arises
Benefits of buying a business on Exchange Marketplace
Building a successful Shopify store from scratch is a tiresome process. With so much effort required, many deviate to plan B- buying a ready-made business on Exchange.
Is it a dream come true or a recipe for disasters? Actually, it could be either! However, if you buy an existing business on Exchange Marketplace properly, you might enjoy these benefits!
- Wide range of options: the price of a store on Exchange varies from roughly $50 to a massive $1 million. And they also come from all shapes and sizes, of all niches and industries. That means your choice is not refined to any criteria.
- Convenience: investing in a current business means skipping many steps that otherwise would have not been possible. That includes basic stuff like listing products, choosing a store theme to advanced settings such as adding review popups, embedding Instagram widgets to increase social proof, etc.
- Compliment an existing business: if you have an existing brick-and-mortar store out there, it’s a brilliant idea to add a complement eCommerce element. For instance, a hair salon selling hair-care products
Things to consider when buying a business on Exchange Marketplace
1. Why do you want to buy the store?
The first and most important question you should ask yourself is “Why do you even want to buy a ready-made business?” Do you want to buy a business on Exchange because you:
- Hope to save yourself from “errors and trials” by acquiring a proven business?
- See the store’s potential growth which the store owner doesn’t?
- Want to compliment your brick-and-mortar store with a steady online site?
With that in mind, you actually don’t have to opt for a $100,000 business. Instead, choose the one that operates in the industry you’re interested in and know well about.
And that leads to the second big question:
2. How much time and money are you willing to invest?
As we stated earlier, a ready-made business on Exchange may vary from $50 to $1 million. However, bear in mind that this is just the up-front cost. You cannot just buy it and forget it.
Here are the costs that might be associated with your store after acquiring it:
- Marketing campaigns (online & offline)
- SEO
- Partnerships
- Software (apps, plug-ins, etc.)
- Store maintenance
- Staff
- Suppliers (if you aim for a dropshipping business)
Before sealing the deal, ensure you have a crystal clear cost-benefit picture of the business after you buy it. Ask yourself:
- What are your financial goals?
- How much money do you willingly want to invest?
- How much time do you want to spend? (If you don’t want the business to encroach too much on your time, perhaps you have to spend more money on hiring more staff)
- Is the learning curve steep?
NOTE: If you’re going to buy a dropshipping business then it’s important to ask the seller How you will ship products to customers & How much will it cost.
And remember you also need an extra budget for the store improvements you might figure out in the future.
3. Why are they selling the business?
Most businesses on Exchange will list the reasons as to why they want to sell the business.
However, you should double-check the sincerity of the given reasons.
Usually, these are the common reasons you might come across while browsing businesses on Exchange:
- They need money for something emergent: unexpected stuff might get in the way and they need an amount of money immediately
- They don’t have time for it anymore: they want to alleviate their time budget to a bigger business with a grander idea
- There are many website builders selling stores for a living: starting a Shopify business doesn’t require much technical skills. Thus, many developers build the websites themselves and sell them on a frequent basis
However, what if in reality the products they are selling are now saturated and they cannot compete with other “big fish” in the field? Or the business doesn’t bring them profit anymore?
With that in mind, you have to conduct external research to certify whether the reason they give is true rather than a perfect cover for something wrong.
That leads to the fourth question:
4. Do you understand the key metrics properly?
Proper store listings on Exchange will explain any unusual ups and downs with the store revenues. If the store you’re checking out doesn’t do so, make sure you ask the seller to explain those abnormal fluctuations.
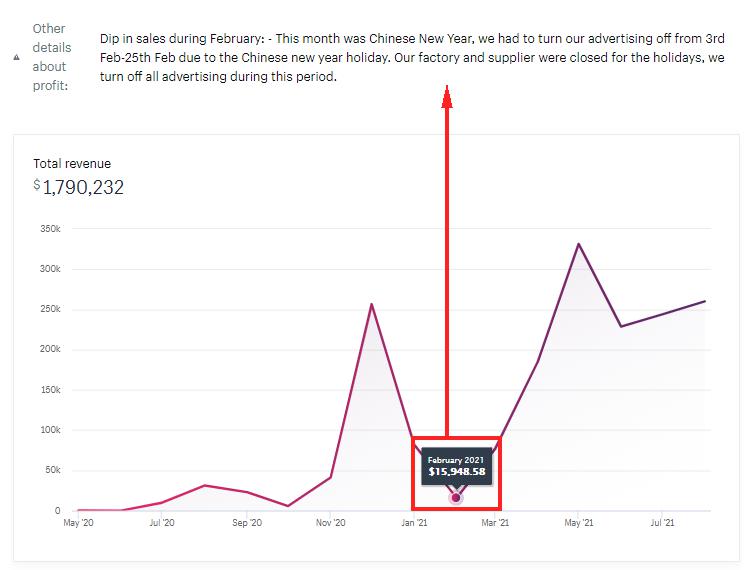
Check whether the site owner explains all the “perks” and “valleys” in details
Usually, when the business owners sell their store, they will stop running ads or halt other marketing campaigns. That often results in a sudden drop in their revenue.
However, if the revenue suddenly soared since they listed their store for sales, be alert!
Remember that a store that has high revenue doesn’t have to be the highly profitable one.
Is it because the seller invests more in advertising to gain traffic than the site actually can earn? For the metrics which are not yet verified by Shopify, double-check them for yourself and ask the seller.
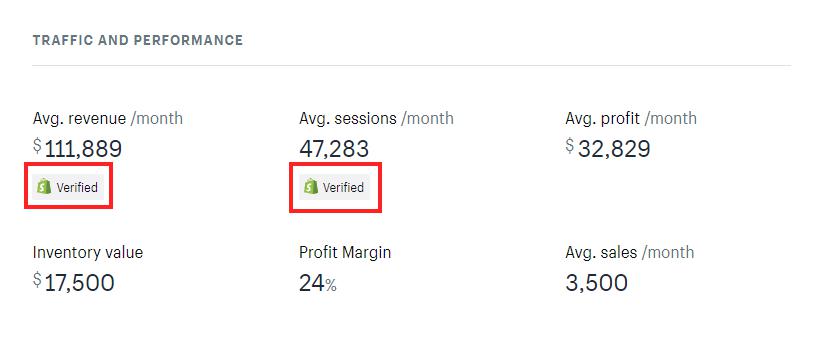
Owing to the fact that profit and profit margin are not labeled “Verified”, ensure you get:
- The traffic influx: where does the traffic come from? Is it the source you can imitate after acquiring the store?
- Financial data: check to see how much the store expenditures might get. Guarantee you know what they are spending to get the current revenues
- Social media performance: does the store have a strong social presence? By that, don’t be deceived by their page likes or followers. Instead, look at the engagement of each post, click on the profiles of the posts’ engagers to see whether they’re real people or bots
You could request the sellers for screen-sharing or ask to obtain “view only” account access for important verifications (traffic, sales, ad spend, etc.).
5. Does the store have crystal clear targeted customers?
Does the store identify clearly the customer’s portray that it’s successfully reaching? If that is the case, do the site’s target audience match or complement your existing or predicted customers?
If your answer is a big “no” or a hesitant “maybe” for the two questions above, perhaps you should look at another alternative on Exchange Marketplace.
Remember that content and SEO keywords can be maneuvered, but it’s nearly impossible to replace the defined target audience with another one.
Thus, ensure you confirm with the seller about their defined target audience when they build the website.
However, an eCommerce site that defines clearly its target audience doesn’t inherently mean the target audience will find the way to the site.
And that leads us to the final question:
6. Does the store have good SEO performance?
Search engine optimization, also known as SEO, can indeed be daunting and exhausting. Therefore, always check the website’s SEO performance first!
An eCommerce website that has high SEO rankings may be expensive but it’s worth it if you want to save resources for other matters.
TIP: Copy the website’s domain and paste it onto similarweb.com for a quick check. From there, see for yourself how much of the traffic comes from organic search.
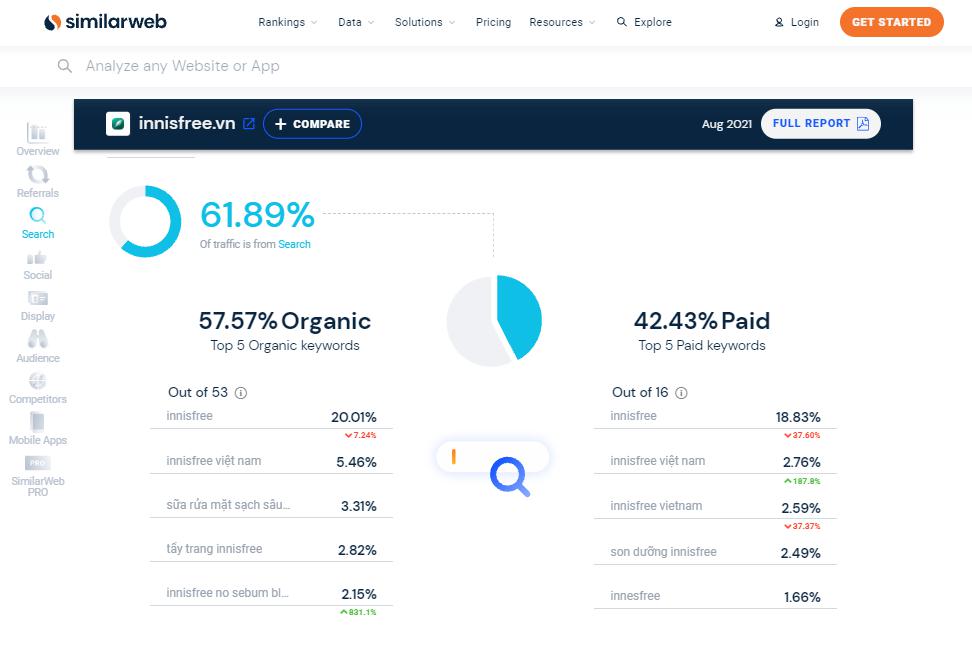
Then see in more details! Is the target audience likely to search for the listed organic keywords?
Apart from that, there might be other important factors you need to see for yourself:
- Age of the domain: it’s since the business was founded. Usually, businesses that have been around for a short amount of time won’t get their way on the top rankings even when everything has been optimized.
- Any penalties imposed by Google? When Google detects and penalizes a website for cheating with SEO tactics, it’s extremely challenging to save it. So make sure you know whether the store you’re going to buy has ever been through something like that.
- Traffic growth trends: has the store traffic grown steadily? A steady growth may signal a strong and ethical SEO effort while abnormal fluctuations indicate a store is being dependent on ads and other inappropriate SEO tactics
Eventually, think about whether the organic keywords that bring most of the site traffic will continue to be in use in the next 6 months and 6 years.
How to buy a business on Shopify Exchange?
After you’ve put everything into consideration, here’s how to buy a store on Exchange Marketplace:
#1. Find the right store
Exchange Marketplace is home to miscellaneous Shopify businesses. Fortunately, finding your dream online store can be done within a few minutes thanks to Exchange’s search filters.
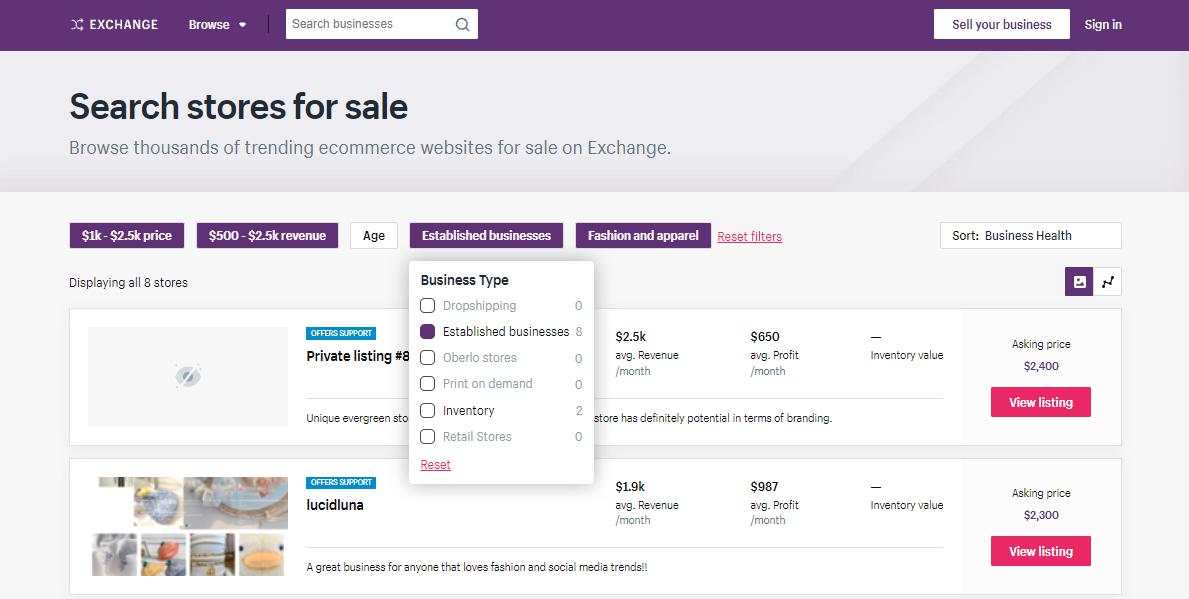
On Exchange, you can browse business by price, revenue, age, business type, and niche
As mentioned above, you don’t have to opt for the most expensive ones. Instead, a perfect store should be the one that fits your demand the most.
TIP: When analyzing the whole purchase, you should compare it with other alternatives. If a business has been there for a long time, you might want to pick up a bargain.
#2. Contact the seller
After selecting the store you’re most interested in, hit ‘Contact Seller’ to leave the seller a message.
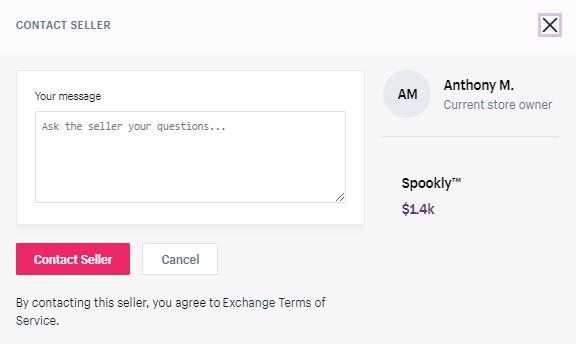
The first message should serve the purpose of getting additional information and confirming the given data.
NOTE: You should not pressure the seller to give you their personal contact information or encourage them to use anything but the Escrow.com payment for transactions.
#3. Do your due diligence
While you’re waiting for the seller’s response, it’s important to carry out more in-depth research on the store’s performance.
There are actually tons of things that the seller can maneuver so that the metrics work to their advantage. They might invest heavily in paid Facebook and Google ads to attract traffic or even process fraudulent orders themselves.
Thus, check their social media accounts to see how their organic posts perform and how the current customers are talking about them.
TIP: Click on the profiles of those who engaged with their posts to see whether they’re real people or not. This is worth your time since you’ll know whether the seller buys fake engagement or not.
You can use some tools such as SEMrush, Similarweb, or Moz to see the site traffic sources then compare these pieces of data to the given ones in their listings.
In case you notice any dissimilarity, be alert and ask the seller since the red flag is probably flying!
#4. Make an offer
After receiving the seller’s response, if you’re satisfied, it’s time to proceed to the next step- making an offer to close the deal.
#5. The seller accepts your offer
When the seller agrees on your offer, he will create an Escrow transaction and you’ll soon receive an email notification for it.
#6. Accept the terms and make the payment
The email notification will include all the terms and conditions of the transaction and guidelines on how to process payment via Escrow.
NOTE: Shopify cannot assist you when the payment process is moved off Escrow. Therefore, in case the seller tells you to do so, contact Shopify ASAP to let them know.
#7. Seller transfers assets to you
Once the payment has been approved, the seller will be notified and transfer all the assets to you. You then have to mark the assets as “received” in Escrow.
#8. Examine and approve your new Shopify store
Ensure that you get what you’ve been promised for your new purchase. In other words, make sure you have full access to the store’s domain, social media accounts, apps, etc.
During this period, the seller will create a staff account for you to use, which normally last from 3 to 30 days (usually it’s 3 days).
NOTE: Don’t export data or make any change to payment & shipping settings/ product catalog at this stage
Should you find any discrepancies, contact exchange-support@shopify.com for further assistance. If you’re satisfied with every bit and piece of the store, change the assets from “received” to “accepted”.
After the inspection stage ends, you’ll be turned from staff to store owner.
#9. Shopify appoints you as the official store owner
In 3 business days, Shopify will appoint you as the administrator and send you a confirmation email about it.
Now the store is officially yours! It’s time to scale it up!
How to sell an online store on Shopify Exchange
Want to sell your Shopify store so that you can focus on other matters? Here’s how!
#1. Make sure you’re eligible
Firstly, you need to ensure you meet Shopify Exchange’s user requirements for sellers as below!
- You must have a Shopify store that actively runs on a paid plan (excluding Shopify Plus)
- Your account must be in good standing with Shopify Payments
- You cannot have any financial aid from Shopify Capital
- You are not using Shopify Balance
- You don’t have any irresolvable issues with the Shopify Risk team, the Shopify Recovery team, or the Shopify Legal team
#2. Install the Exchange app
After passing the eligibility test, install the Exchange Marketplace app to list your business. (only the store owner can do this)
#3. Create, submit, and publish your listing
Though Shopify will auto-pull key metrics to your listing, it’s still your main responsibility to put in and present the details so that it sounds like a great deal.
Many buyers can be extremely skeptical about the reasons you sell out the business. Thus it’s important to tell an inspiring but persuasive story in the Business Story section.
Don’t forget to fill out the Performance, Expenses, Sale Includes, and Seller’s Advice section.
Remember to highlight your store’s competitive advantage. This can be an extra-large email list, an Instagram account with 10,000 followers, or anything that you think might add value to the buyer.
Submit your listing for review when you’re satisfied. Once Shopify has approved your listing, you can officially publish it.
#4. Respond to buyer inquiries and offers
Interested buyers will contact you for further information and negotiation regarding what’s included in the package.
Take some time to review the buyers’ offers but don’t let them wait for too long. (hours of waiting can be off-putting especially if you offer post-sale assistance)
After reviewing, you can decide to accept or decline the offer. Or you can choose to message them for further negotiation.
#5. Accept an offer
After the exhausting negotiations and you and the buyer finally come to an agreement, create the Escrow transaction in the Exchange app.
An email notification will be sent to the buyer to ask him to agree with the terms and conditions.
#6. Transfer assets to the buyer
After Escrow receives the buyer’s funds, you’ll be notified to transfer your assets.
Create a staff account for the buyer to use in his inspection stage (which will last from 3-30 days).
Unless anything happens, the buyer will mark the assets as “accepted” in Escrow.
#7. Get your money
The Escrow Department will send the money to you within 5 working days. At this stage, you can rest assured that the money is safe and sound in your bank account since Shopify will take care of the rest, which are:
- Appointing the buyer from staff to store owner
- Removing your billing and payment information
Is Shopify Exchange Marketplace for you?
Want to run a proven business without trial and error? Exchange Marketplace is an ideal hub for you to browse and buy a ready-made business.
But if you want to build a Shopify store from scratch, you might love to read our articles on:
 socialshop
 socialpublish
 socialreply
 socialwidget