
It’s essential to create shoppable Instagram posts cause it is not only one of the social selling trends but also the best way to drive sales and traffic effectively for your Shopify businesses in 2021.
To fully leverage shoppable posts to get more sales on Instagram, businesses of all sizes and shapes should understand it clearly first. Afterward, we will guide you through all the simple steps to create and make an Instagram post shoppable. Let’s start with the definition first.
Table of Contents
What is a shoppable Instagram post?
‘Create Shoppable Instagram posts’ is a term referring to the action of tagging products to unpaid Instagram posts. The ultimate goal of product tagging is to lead users from Instagram to the brand’s websites where the tagged products can be purchased.

Add product tags to create shoppable Instagram posts
Business owners and creators can tag products to not only images but also videos, carousels, IGTV, Reel, Guide, and even Livestream. The maximum number of products that can be tagged to an image or video is 5. Also, you can add no more than 20 products to a multi-image post.
With product tags, Instagram users only need a tap to check out product details and make a purchase. You know what? Users can even do payments right on the platform with Instagram checkout.
Obviously, shoppable Instagram posts are changing the e-commerce game on Instagram. However, if you still doubt the efficiency of the shoppable posts, let us blow your mind with several reasons.
Why should you create shoppable Instagram posts?
First of all, shoppable Insta-posts offer your prospective customers a direct path to your brands and help you boost sales. Also, it makes the customer journeys seamless from seeing a product to make a purchase. These two factors will simplify the way customers shop as well as provide business owners with more slots to display and promote their products on social. Eventually, it drives up your sales.
Secondly, Instagram has proven itself to be a huge potential market for e-commerce with over 1.16 billion monthly active users. By showing your products on Instagram, you are approaching more prospective customers than ever before.

Thirdly, no other better way to test your products on the real market than to create shoppable Instagram posts. By connecting with your customers on Instagram posts, you will be able to identify which products your target audiences will like and be willing to buy.
Last but not least, shoppable Instagram posts eliminate the shopping barriers in comparison with other e-commerce platforms. Nowadays, customers are savvy in social media ads and marketing, so it is very hard to convince them to buy directly on e-commerce platforms as before. However, if you approach them in an indirect way through Instagram posts, they tend to let the guard down and check out your products through Insta-posts.
Are these reasons strong enough to convince you to create shoppable Instagram posts? If the answer is yes, then we’re not gonna waste your time. Let’s craft your post that sells on Instagram now.
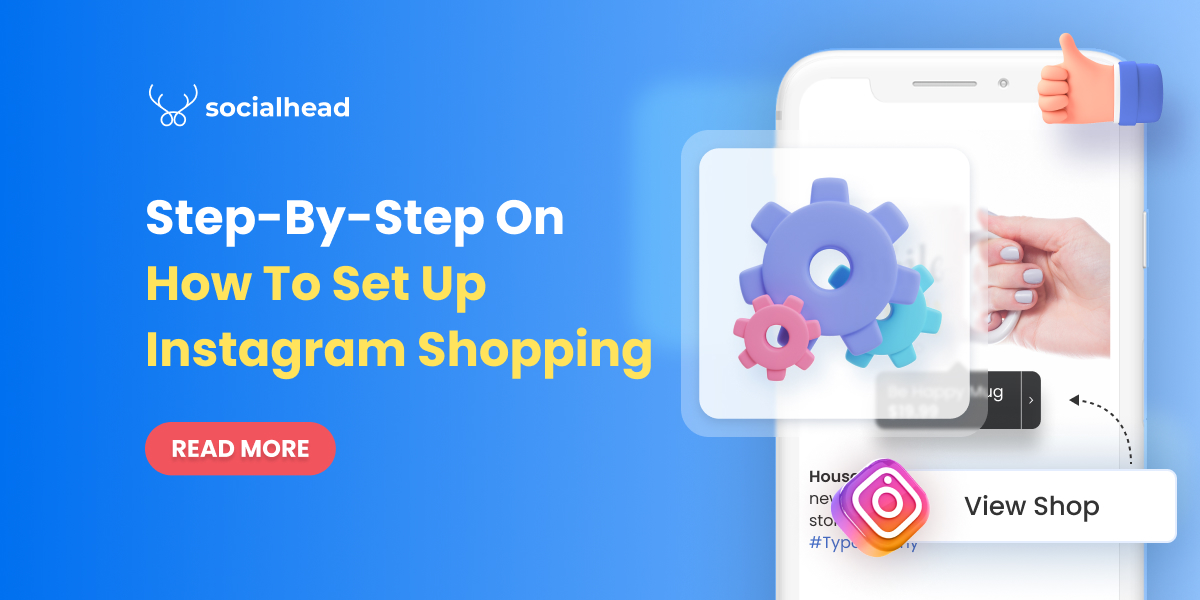
How to create shoppable Instagram posts easily?
Before you start to tag products to make your Instagram posts shoppable, you must set up Instagram Shopping first. To do so, your business must meet certain requirements:
- Your business located in Instagram’s supported markets.
- All your products are eligible to be sold.
- Your business complies with Instagram’s Merchant Agreement and Commerce Policies.
- Your business owns a website domain from where you intend to sell your products.
All done!? Let’s get to the first step to create shoppable Instagram posts.
Step 1: Convert to the Instagram business account
First thing first, you have to switch your personal account to a business account. Do as instructed below:
On Mobile: Go to your Instagram profile > Click on the 3 lines in the top right > Go to setting > Account > Switch to Professional Account > Business > Done
On desktop: Go to your Instagram profile > Settings > Switch to profession account > Choose Business > Select your business category > Add business contact info or skip it > Done
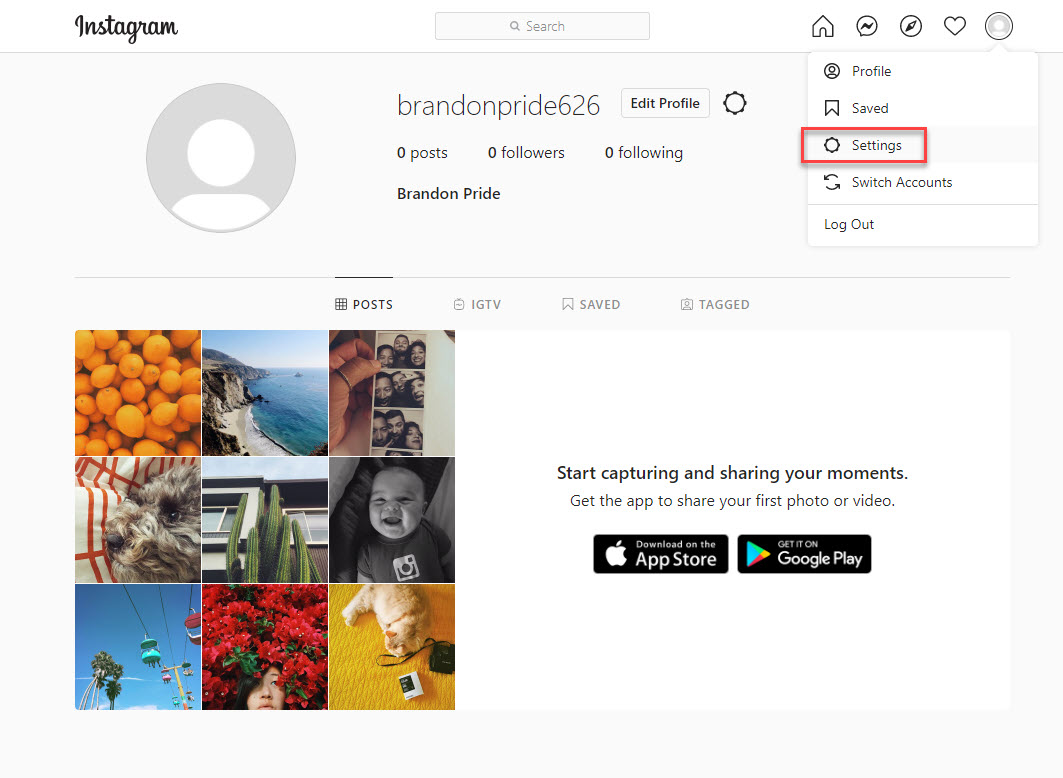
Go to your Instagram account settings
Firstly, go to your Instagram account settings.
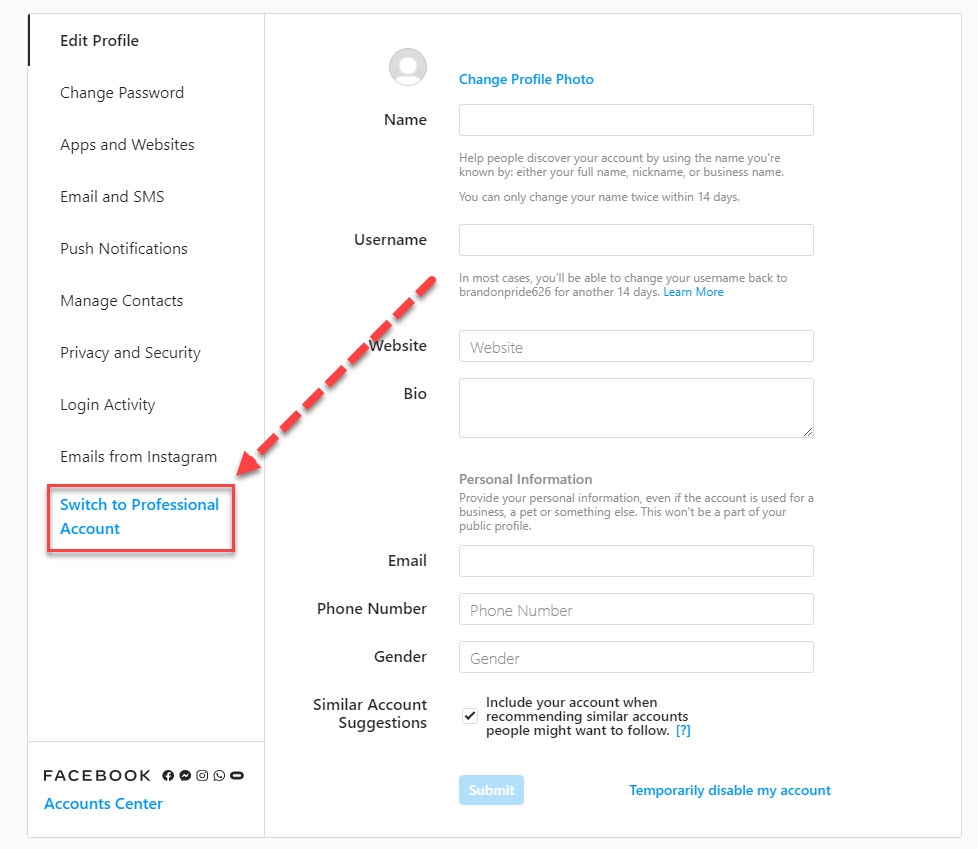
Switch your personal account to a business account
Then proceed to Switch to Professional Account.
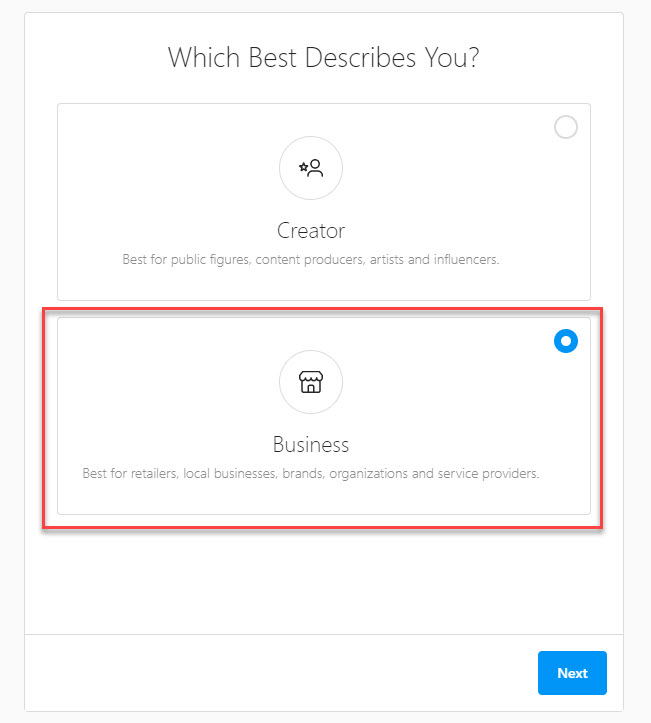
Choose Business
You are given 2 options to turn your Instagram account into an account for Creator or Business.
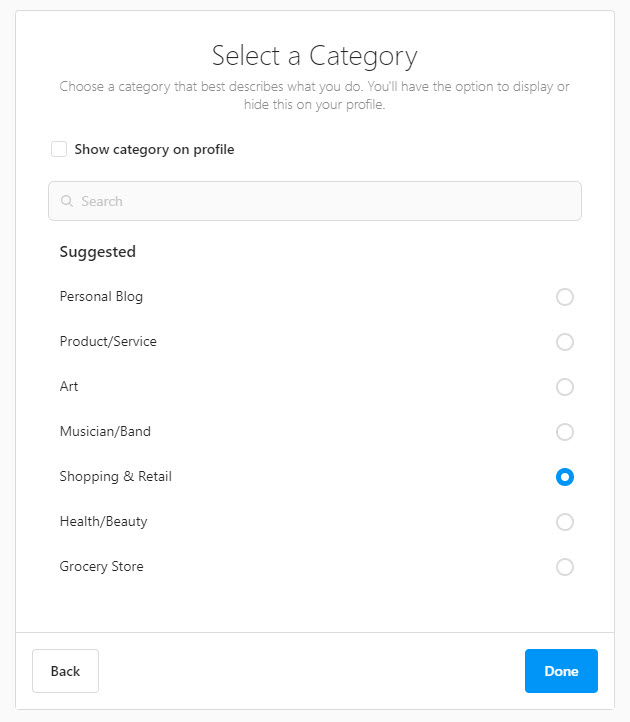
Pick the category for your business
There are multiple categories to choose from. You should pick the most relevant category for your business.
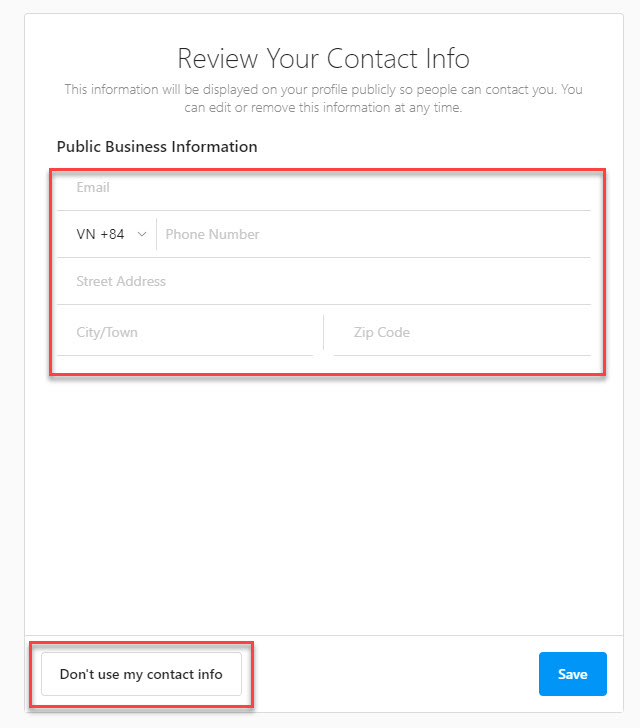
Add your business contact information
Once you own a business account, you can add in relevant business information including business address, phone number, business email, etc. Then, you can also link your business account to your website.
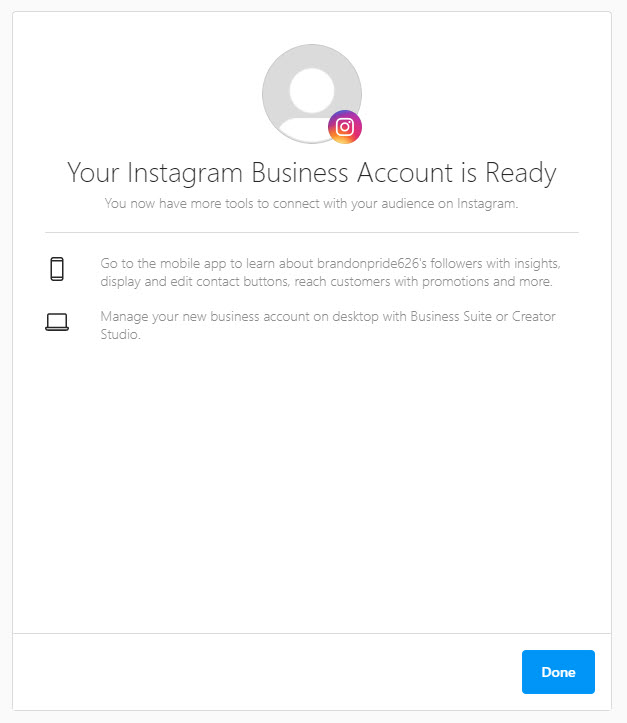
Now, your Instagram business account is ready
NOTE: If you already have an Instagram business account, you can skip this step and proceed to step 2.
Step 2: Connect to your Facebook page
In this step, we are going to link your Instagram business account to your Facebook page. You can connect your Instagram business account to your Facebook page in two different ways:
From Facebook
Log in to Facebook > Select Pages > Choose Settings (From your Facebook page) > Scroll down and select Instagram > Click on Connect Account > Input your Instagram username and password > Done

Connect your Instagram business account to your Facebook page
From Instagram
Go to your Instagram business profile > Select Edit Profile > Select Page > Pick the Facebook page you want to connect > Done.
NOTE: You only need a Facebook page to connect to your Instagram business account, not Facebook Page Shop.
Now, your Facebook page and Instagram business account are connected.
Step 3: Upload product catalogs to Facebook
Since your Instagram business account already connected to your Facebook page in the previous step, all you need to do now is to upload products to your Facebook page’s catalogs, then the products will be updated on your Instagram account automatically.
To ease the process of creating Facebook catalogs and uploading products manually, we recommend you to use Socialshop.
With Socialshop, you can sync all your products from your Shopify/WooCommerce/BigCommerce to Facebook catalogs automatically in a click.

Socialshop – Sync products from Shopify/WooCommerce/BigCommerce to Facebook automatically easier than ever
Once you’ve done it, all your products will be available on your Facebook page shop as well as on Instagram (As we linked Facebook page with Instagram business account). Let’s proceed to step 4.
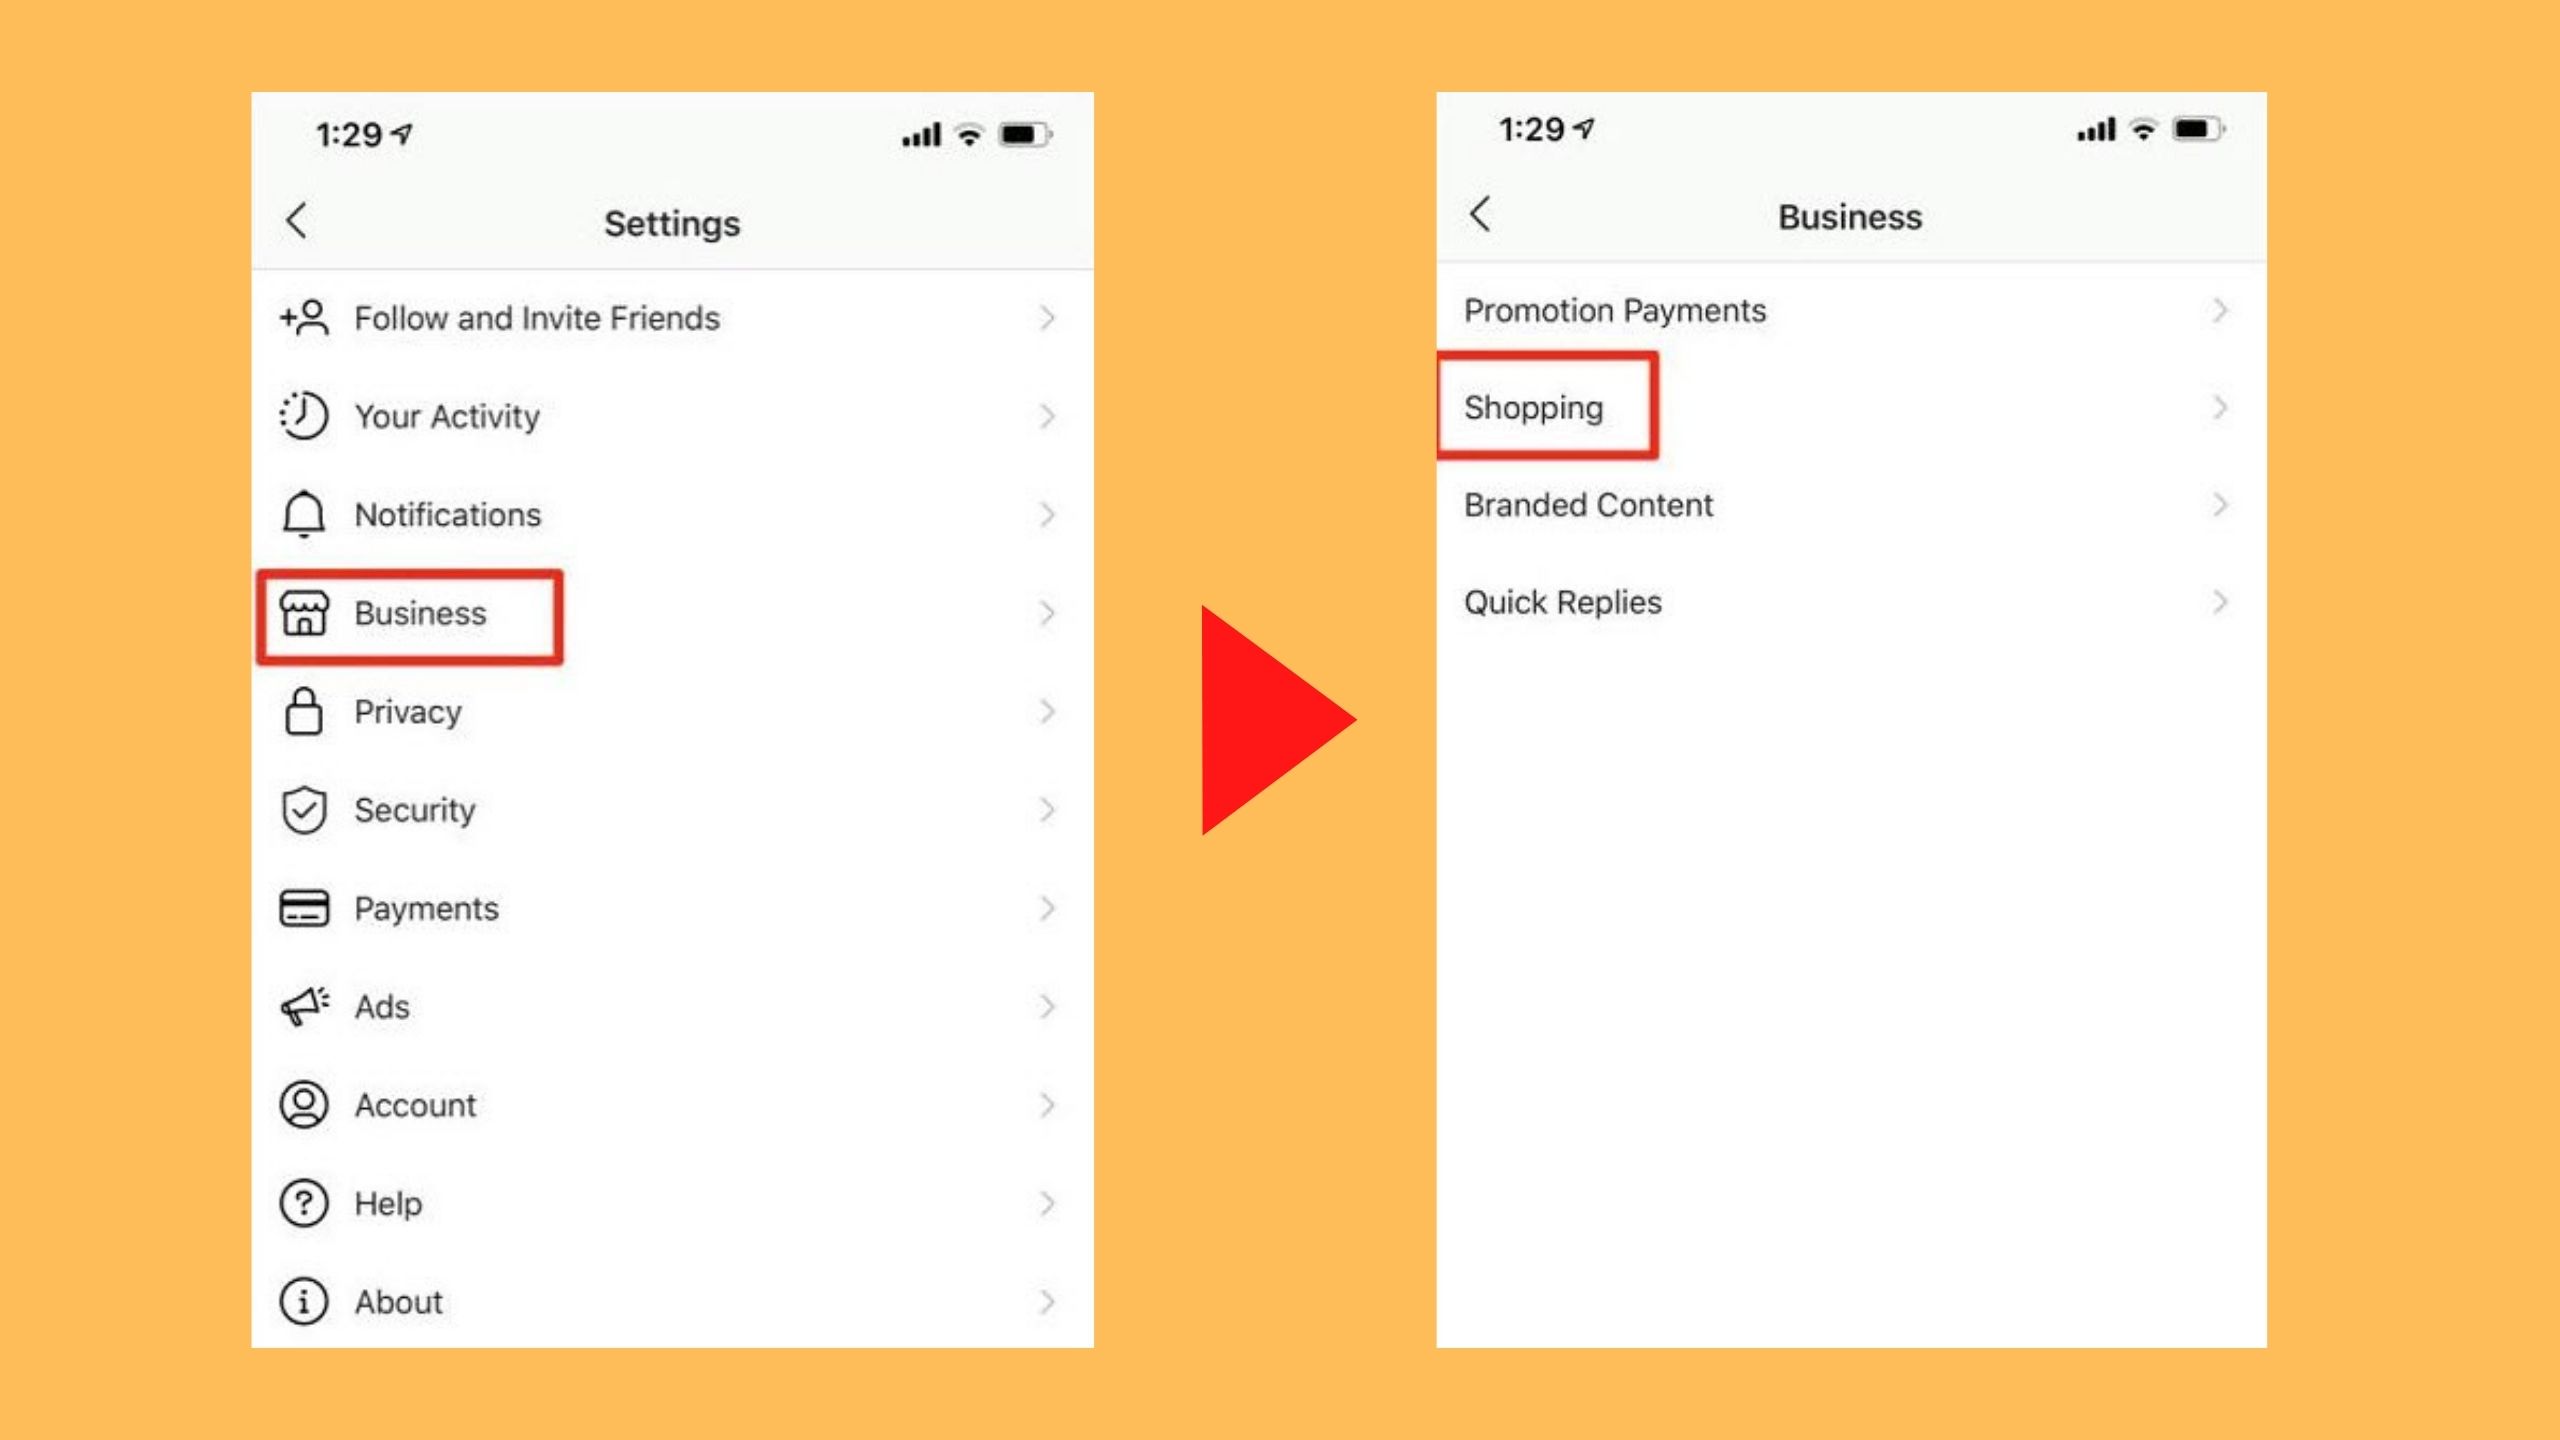
Step 4: Submit your account for review
Next, you need to submit your Instagram business account for review. Follow the instructions below:
Go to your Instagram business page > Settings > Business > Shopping > Done
Now, you have to wait for a few days until your Instagram business account is approved for the shopping feature. However, the account review process sometimes takes you longer.
In some cases, you are asked to prove your ownership of your website domain before submission, follow the instructions here to complete domain verification. Then, you can submit your account for review.
Step 5: Activate the Shopping feature
Once your account is approved for Instagram Shopping, you can enable the Shopping feature.
Go to your Instagram business page > Settings > Business > Shopping > Select Product Catalog you want to link to your account > Done
After your Instagram business account is approved, you can activate the Shopping feature
NOTE: If you are unable to access Shopping, perhaps your account is still being reviewed or has not been approved for Instagram Shopping.
Step 6: Create shoppable Instagram posts
Finally, you are fully enabled to use product tags to highlight your products in Instagram posts.
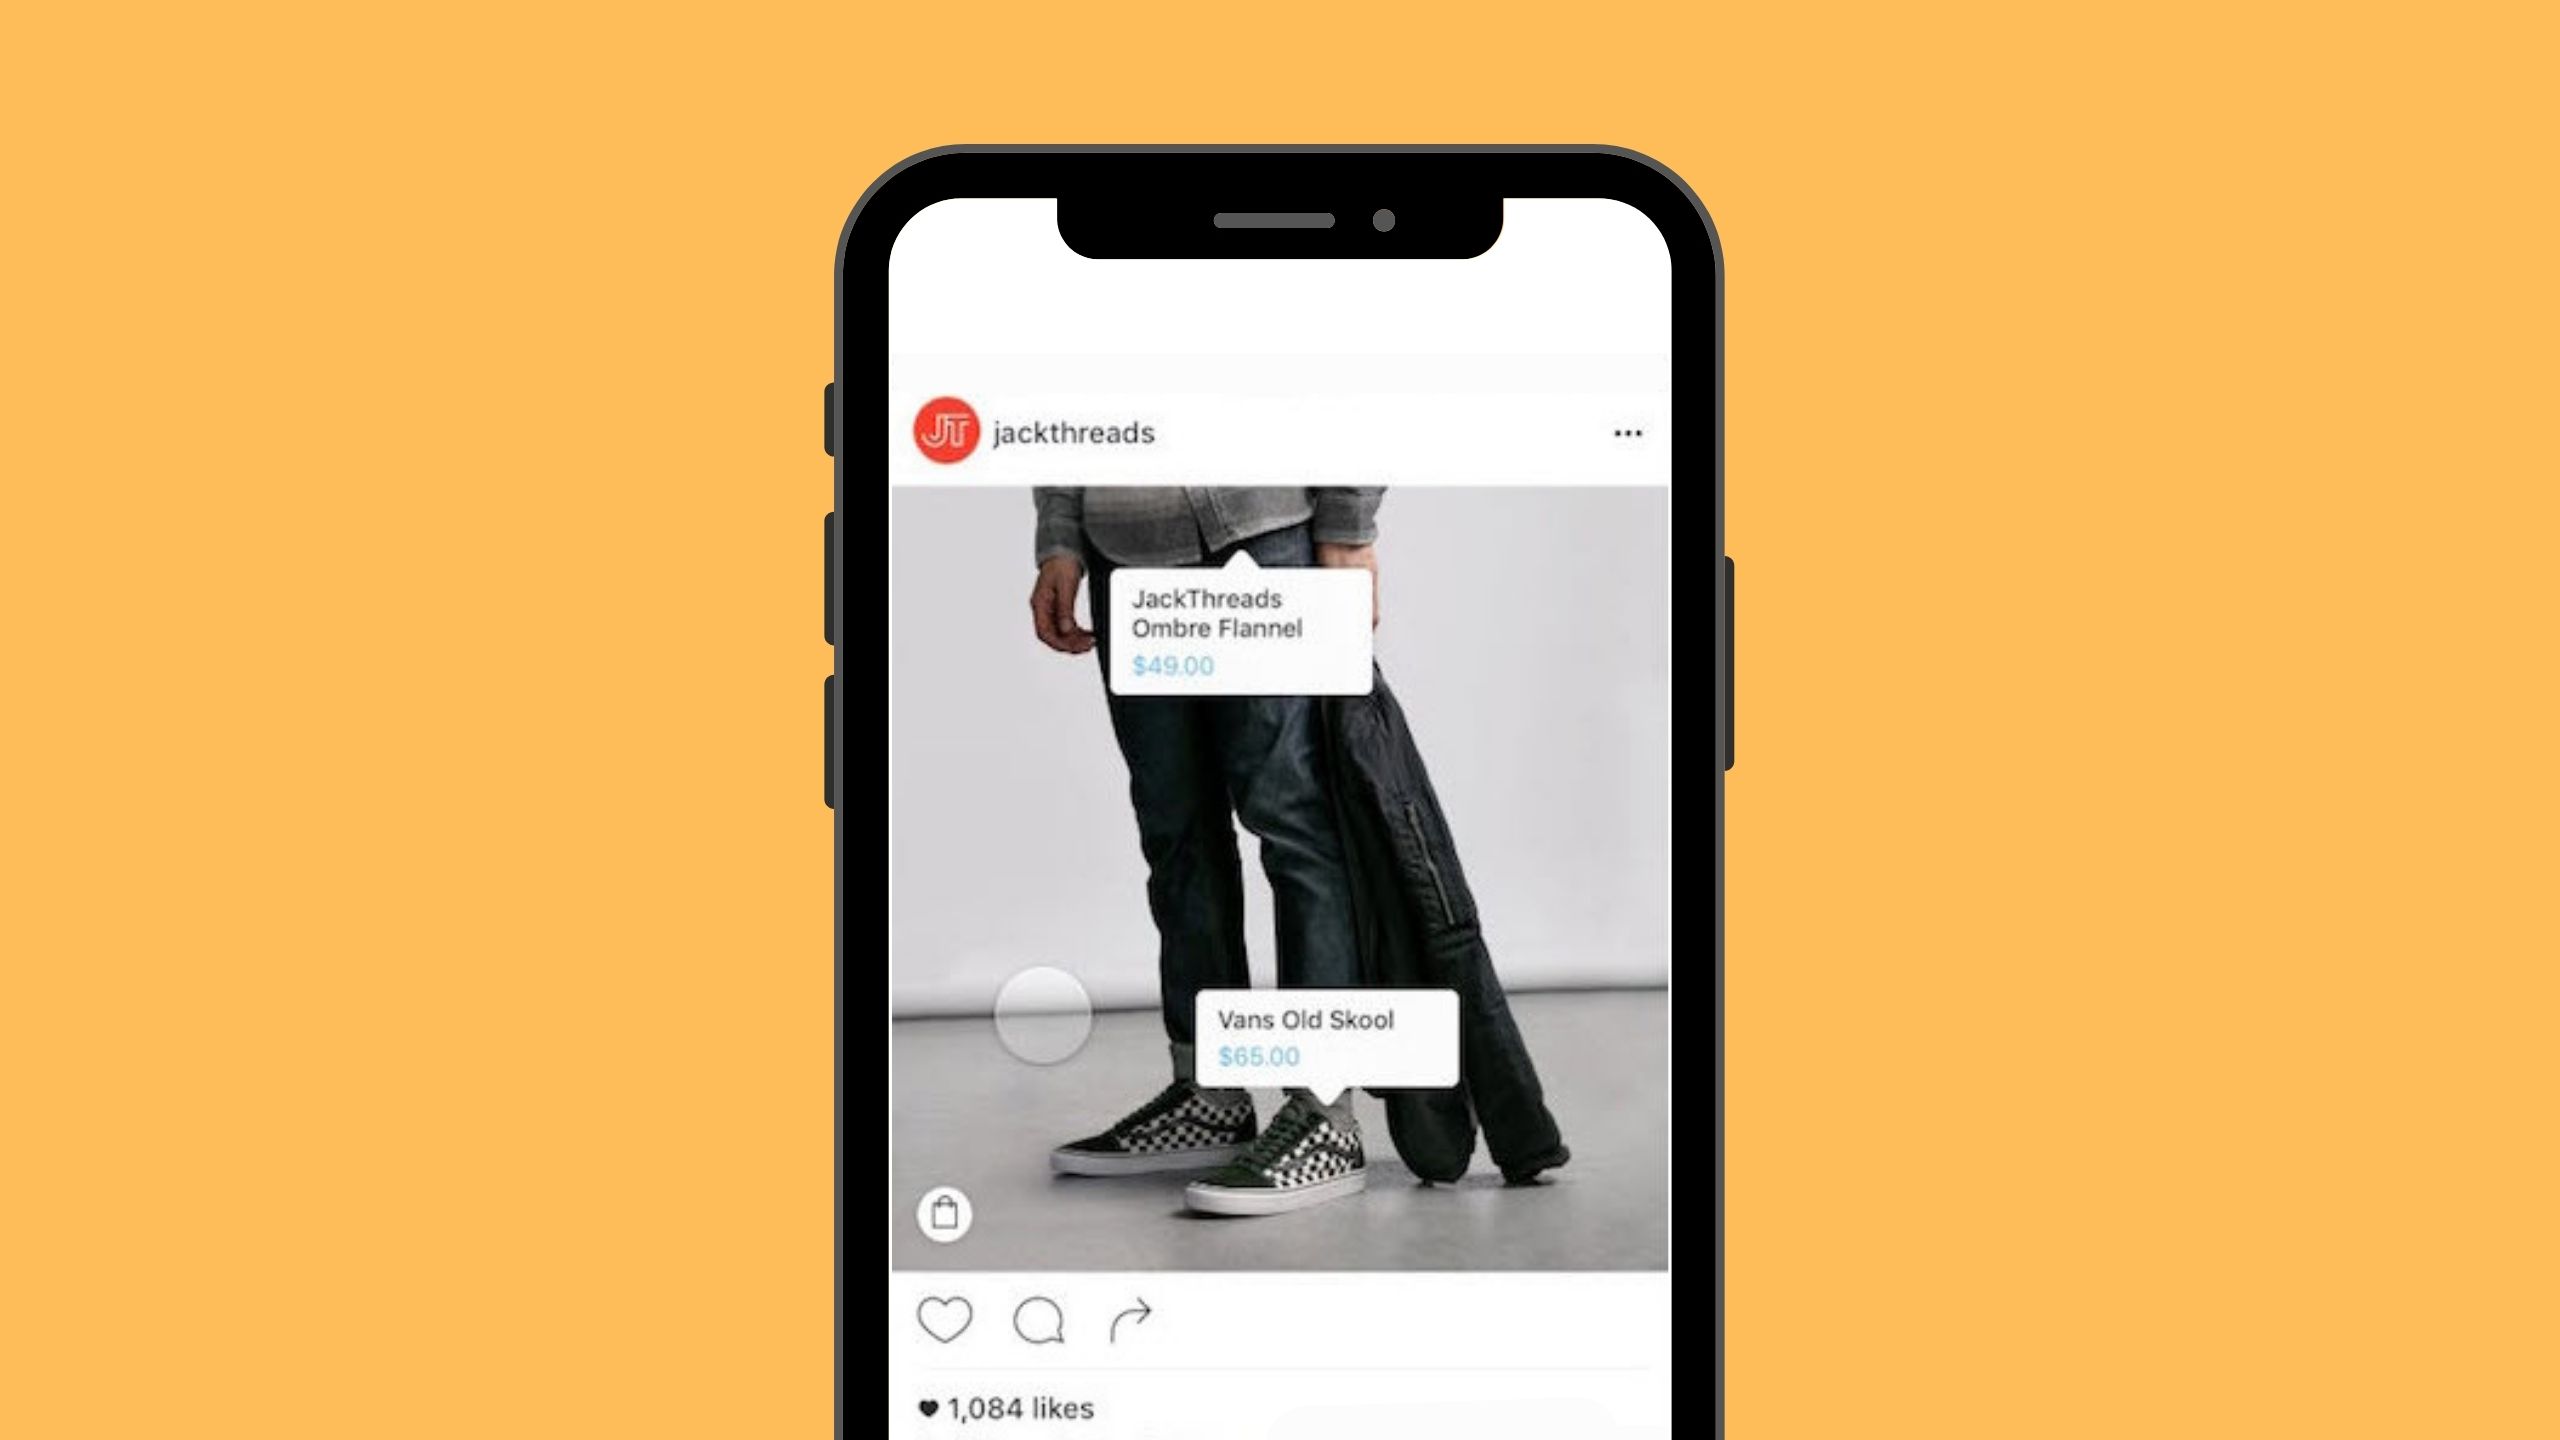
It’s time to tag products to your Instagram posts
You can create a post as usual and add product tags to your video or images. As mentioned above, you can add a maximum of 5 products to an image or video, and up to 20 tags for the carousel.
To tag products to your Instagram post, follow these steps:
Add photos/video > Add note > Click on Tag Products > Tap on the photos/video > Search products > Select products > Click on Done > Share.
Once you finished, your posts are shoppable now. Instagram users can check out all the products you tagged on your posts easily in a click.
Final thoughts
In brief, it is essential for you to leverage Instagram posts to promote your products and drive more sales. To create shoppable Instagram posts, you should follow our 6 steps:
- Convert to an Instagram business account
- Link your Instagram business account to your Facebook page
- Connect product catalogs to Facebook
- Submit your Instagram account for review
- Activate Shopping feature
- Craft a post and add product tags to make it shoppable
Let’s create your shoppable Instagram posts and rock your sales today!


 socialshop
 socialpublish
 socialreply
 socialwidget